Pumpkin seeds often get tossed aside after carving pumpkins, but I’ve found their true magic lies in roasting. It’s such a simple step that turns a humble seed into a snack that’s both satisfying and surprisingly versatile. Plus, the process is quick, and the flavors you can coax out are endless—sweet, spicy, smoky, or all of the above.
What I love most is how customizable roasted pumpkin seeds are. A sprinkle of chili powder, a dash of cinnamon, or even a splash of soy sauce—each batch can be different, reflecting whatever mood I’m in or what I have on hand. It’s a little ritual that makes me feel resourceful, turning leftovers into something crave-worthy.
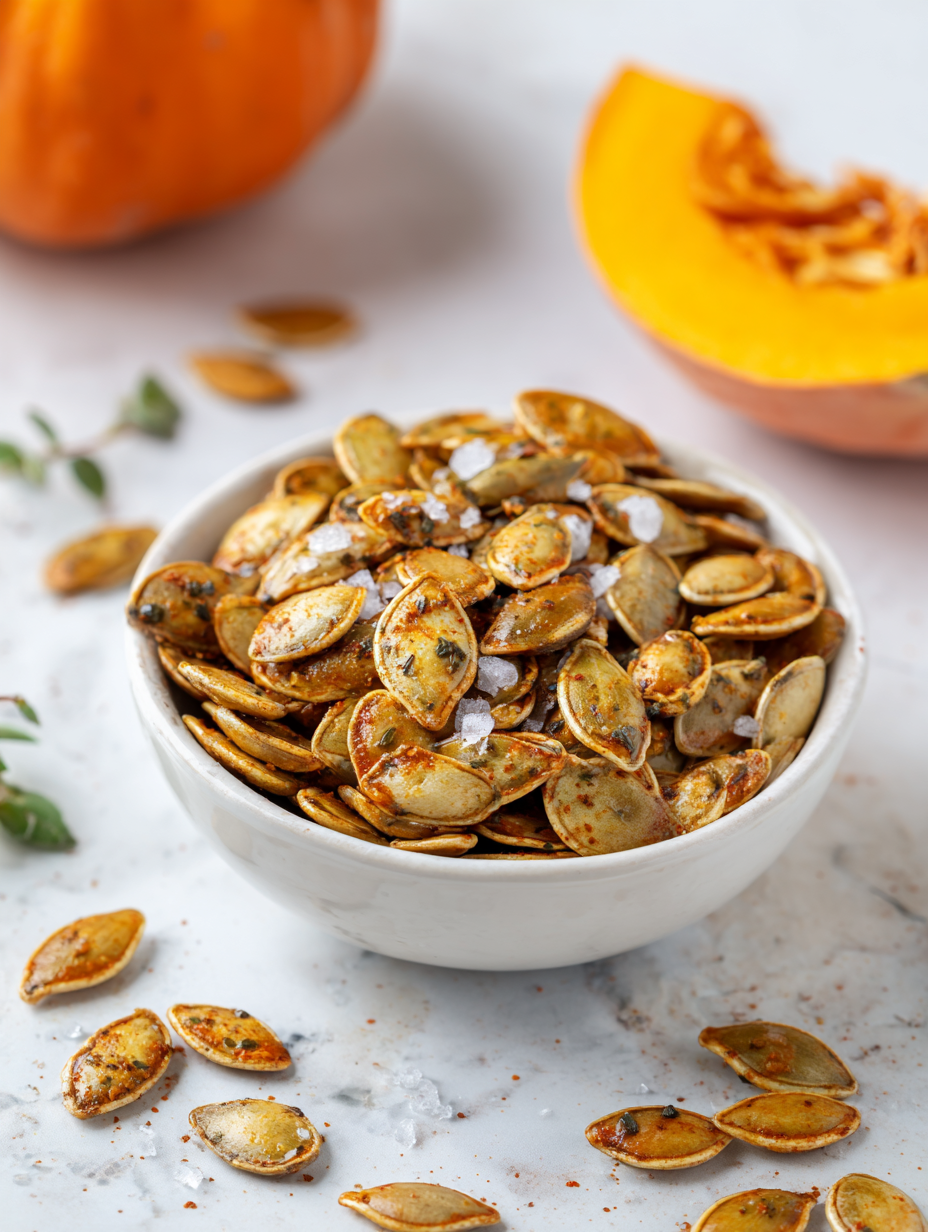
And honestly, there’s something satisfying about cracking open a jar of these roasted seeds. They carry that toasty aroma that immediately makes the kitchen feel cozy. Whether I’m snacking during a movie or tossing them on a salad, they’ve become a tiny, crunchy reminder that the simplest ingredients often shine the brightest.
Focusing on the overlooked charm of using pumpkin seeds as a versatile snack that can be customized with unexpected spices, transforming a simple seed into a flavorful, crunchy treat that surprises your taste buds.
The story behind this recipe
I started roasting pumpkin seeds one fall after carving pumpkins with my kids. The first batch was an experiment—way too salty, but the aroma of toasted seeds filled the kitchen with a nostalgic, cozy vibe. Since then, I’ve played with different spices, trying to find that perfect balance between crunch and flavor. It’s become a little ritual for me, pulling out the seeds after Halloween or any pumpkin carving session, knowing I’ll turn those leftover bits into something addictive. There’s something honest about roasting seeds; it’s a simple act that transforms what might be discarded into a snack full of crunch and unexpected spice. Each batch feels like a small victory—proof that the best flavors come from just a handful of ingredients, roasted to bring out that deep, nutty aroma.
Ingredient breakdown
- Pumpkin seeds: I always pick the freshest, plumpest seeds I can find. They’re the base of everything, so quality matters here. If they feel a bit dry, give them a quick rinse and pat dry—extra moisture can lead to uneven roasting.
- Olive oil: A light coating of good olive oil adds just enough richness and helps seasonings stick. Skip the oil if you want a cleaner, crunchier seed—just watch for sticking on the baking sheet.
- Salt: I prefer flaky sea salt for that burst of briny flavor and crunch. Too much salt can overpower; start small and adjust after tasting a batch.
- Spices: I love experimenting with smoky paprika or cumin for depth. Toasting the spices briefly before mixing releases their aroma—just keep an eye to prevent burning. For sweeter notes, cinnamon or sugar work beautifully; sprinkle gently to avoid clumping.
- Sweeteners (honey or maple syrup): A light drizzle coats the seeds with a shiny, sweet glaze. If you want a less sticky finish, use less or skip this step altogether—your seeds will still be flavorful and crisp.
- Add-ins (like chili flakes or garlic powder): They bring a punch or aroma that transforms the snack. I recommend adding these after roasting, so they don’t burn and turn bitter. Fresh herbs can add brightness if added post-bake.
Spotlight on key ingredients
Pumpkin seeds:
- I always choose the freshest, plumpest ones. Their size and moisture affect how evenly they roast and crunch up—dry, fresh seeds give the best texture.
- Olive oil: A light coating helps seasonings stick and promotes even roasting. If you skip it, seeds may be less shiny and slightly less crispy, but they’ll still be tasty.
Spices:
- Salt: I prefer flaky sea salt for that satisfying crunch and burst of briny flavor. Too much can overpower, so start small and adjust after baking.
- Toasting paprika or cumin briefly releases aroma and deepens flavor. Burnt spices turn bitter—keep a close eye during the last few minutes.
Notes for ingredient swaps
- Oil-Free: Use a light spray of water or skip oil altogether. The seeds will be less uniformly seasoned but still crunchy.
- Salt Alternatives: Sea salt is classic, but smoked salt or flavored salts add a different twist—think smoky or herby notes.
- Sweeteners: Maple syrup or honey can replace sugar for a more complex, caramelized finish. Use sparingly to avoid sticking.
- Spice Variations: Cumin, coriander, or curry powder offer warm, aromatic flavors—swap in your favorites for a different profile.
- Vinegar: A splash of apple cider vinegar after roasting adds a tangy brightness—skip if you prefer pure toasty flavor.
- Herbs: Fresh thyme or rosemary can be sprinkled on hot seeds for an herbal punch—use sparingly so they don’t burn.
- Seeds: Sunflower or sesame seeds can be roasted similarly, offering different textures and flavor profiles—experiment freely.
Equipment & Tools
- Baking sheet: To hold the seeds during roasting for even heat exposure.
- Parchment paper: Prevent sticking and make cleanup easier.
- Mixing bowl: Tossing seeds with oil and seasonings evenly.
- Spatula or spoon: Stirring and spreading seeds on the sheet.
Step-by-step guide to roasting
- Preheat your oven to 180°C (350°F). Line a baking sheet with parchment paper for easy cleanup.
- Gather your pumpkin seeds: about 1 cup of raw, fresh seeds. Rinse them under cold water to remove any pulp, then pat dry thoroughly with a towel. Moisture is the enemy of crispiness.
- In a bowl, toss the seeds with 1 tablespoon of olive oil. Make sure they’re evenly coated—that’s what helps the seasonings stick and the seeds roast evenly.
- Sprinkle about 1/2 teaspoon of flaky sea salt over the seeds. Add your chosen spices now—paprika, cumin, or chili flakes—about 1 teaspoon or to taste. Toss again to distribute.
- Spread the seeds in a single layer on the prepared baking sheet. Don’t crowd them; give each seed room to roast and crisp.
- Bake for 15-20 minutes. Every 5 minutes, give the pan a gentle shake or stir with a spatula. Watch for a golden hue and a toasty aroma—this is your cue they’re nearly done.
- Check the seeds: they should be fragrant, golden-brown around the edges, and feel firm but not burnt when you bite into one. If they’re still soft or pale, give them a few more minutes.
- Remove from oven and let them rest on the baking sheet for 5 minutes. This helps them finish crisping up. If you notice any seeds that seem underdone, pop them back in for another minute or two.
- Transfer to a bowl or plate. Toss lightly with a pinch more salt or your favorite finishing spice if needed. Serve warm or at room temperature.
Let the seeds rest on the baking sheet for 5 minutes to crisp up further. Then, transfer to a bowl. Serve immediately or store in an airtight container once cooled.
How to Know It’s Done
- Seeds are golden brown and fragrant.
- Crackling sound from oven indicates proper roasting.
- Seeds feel firm and crunchy when cooled.
Roasted Spiced Pumpkin Seeds
Ingredients
Equipment
Method
- Start by rinsing the pumpkin seeds in cold water to remove any pulp and debris, then pat them thoroughly dry with a towel. This step ensures they crisp up nicely during roasting.
- Place the dried seeds in a mixing bowl and pour over the olive oil. Toss well to coat each seed evenly, which helps the seasonings stick and promotes even roasting.
- Sprinkle the flaky sea salt, paprika, and cumin over the oiled seeds, then toss again to distribute the spices uniformly. Feel free to add any other spices or sweeteners you like.
- Line a baking sheet with parchment paper and spread the seasoned seeds in a single, even layer, giving each seed room to roast and crisp.
- Place the baking sheet in the preheated oven at 180°C (350°F) and bake for about 15-20 minutes. Shake the pan or stir the seeds every 5 minutes to promote even browning and prevent burning.
- Keep an eye on the seeds as they turn golden brown and fragrant—this indicates they’re ready. Once they reach the desired color, remove the baking sheet from the oven.
- Allow the seeds to cool on the baking sheet for 5 minutes. As they cool, they will become crispier and more flavorful.
- Transfer the cooled seeds to a bowl, taste, and adjust the seasoning if needed. Serve immediately or store in an airtight container for later snacking.
Notes
Pro tips for perfect pumpkin seeds
- Bolded mini-head: Use fresh seeds for better crunch and flavor. Old seeds tend to be dull and chewy.
- Bolded mini-head: Pat seeds dry thoroughly before roasting. Moisture causes uneven browning and sogginess.
- Bolded mini-head: Toss seeds with oil and seasonings while still warm from oven. This helps the spices stick better.
- Bolded mini-head: Shake or stir the seeds every 5 minutes during baking. This ensures even roasting and prevents burning.
- Bolded mini-head: Keep an eye on color after 15 minutes. Seeds turn quickly from golden to burnt, so stay close.
- Bolded mini-head: For extra flavor, add spices after roasting. Heating spices too long can turn them bitter.
- Bolded mini-head: Let seeds rest for a few minutes after baking. They crisp up further as they cool down.
Common mistakes and how to fix them
- FORGOT to dry seeds thoroughly → Seeds must be completely dry to prevent steaming.
- DUMPED too much oil → Use just enough oil for seasoning; excess causes sogginess.
- OVER-TORCHED seeds → Remove promptly once they turn golden to avoid bitterness.
- MISSED stirring during baking → Shake or stir every 5 minutes for even crispness.
Quick fixes and pantry swaps
- If seeds seem soft, splash with a tiny bit more oil and bake another 2 minutes.
- When seeds stick to the pan, patch with parchment paper to prevent tearing during removal.
- Splash seeds with a dash of lemon juice if they taste flat or dull.
- Dumped too much salt? Rinse lightly and dry before roasting again for balanced flavor.
- Over-torched seeds? Shield with foil and lower the oven temperature for a gentler roast.
Prep, store, and reheat tips
- You can rinse and thoroughly dry the pumpkin seeds a day before roasting to save time and ensure crispness.
- Store cooled roasted seeds in an airtight container at room temperature for up to 5 days; keep them away from humidity to maintain crunch.
- For longer storage, freeze seeds in a sealed bag for up to a month—perfect for prepping in advance for gatherings.
- Reheat seeds in a 150°C (300°F) oven for 5 minutes; they’ll regain their crunch with a warm, toasty aroma. Watch for over-browning.
Top questions about pumpkin seeds
1. How do I pick good pumpkin seeds?
Look for seeds that feel firm, plump, and have a fresh, earthy smell. Avoid any that are shriveled or musty.
2. Should I wash the seeds before roasting?
Rinse the seeds in cold water to remove pulp, then pat completely dry with a towel before roasting.
3. Is oil necessary for roasting pumpkin seeds?
Yes, tossing seeds with a little oil helps them crisp up and makes seasonings stick better during roasting.
4. How long should I roast pumpkin seeds?
Bake at 180°C (350°F) for 15-20 minutes, shaking the pan every 5 minutes until golden and fragrant.
5. Can I add spices before roasting?
Yes, adding spices like paprika or chili flakes before roasting intensifies their aroma and flavor as they toast.
6. How should I store roasted pumpkin seeds?
Store cooled seeds in an airtight container at room temperature for up to 5 days for best crunch.
7. Can I reheat roasted seeds?
Reheat in a 150°C (300°F) oven for 5 minutes to regain crispness and aroma without burning.
8. What if my seeds burn during roasting?
If seeds burn quickly, reduce oven temperature and stir more often to prevent charring.
9. Can I sweeten pumpkin seeds?
For a sweet twist, drizzle honey or maple syrup over seeds before roasting for a shiny, caramelized coating.
10. Can I use other seeds instead of pumpkin seeds?
Yes, you can substitute sunflower or sesame seeds; they roast similarly but have distinct flavors and textures.
Roasted pumpkin seeds are a humble snack that surprise with their depth of flavor and satisfying crunch. They’re perfect for cozy evenings or when you want to add a little something extra to salads or charcuterie boards.
Making them at home means you control the seasoning and can experiment with flavors that suit your mood. Once you get the hang of it, you’ll find yourself reaching for a handful more than you expected, drawn in by that rich, toasty aroma.

Welcome to Exploreing New Tastes. I’m really glad you found your way here. I’m a food blogger driven by curiosity more than perfection. I think about flavors constantly, how they change across cultures, how a small tweak can completely shift a dish, and how food tells stories long before anyone sits down to eat. This blog is where I document that curiosity, one recipe and one experience at a time.