Blog

  • Pumpkin Power: The Secret Ingredient That Transforms Your Pancakes

    Pumpkin Power: The Secret Ingredient That Transforms Your Pancakes

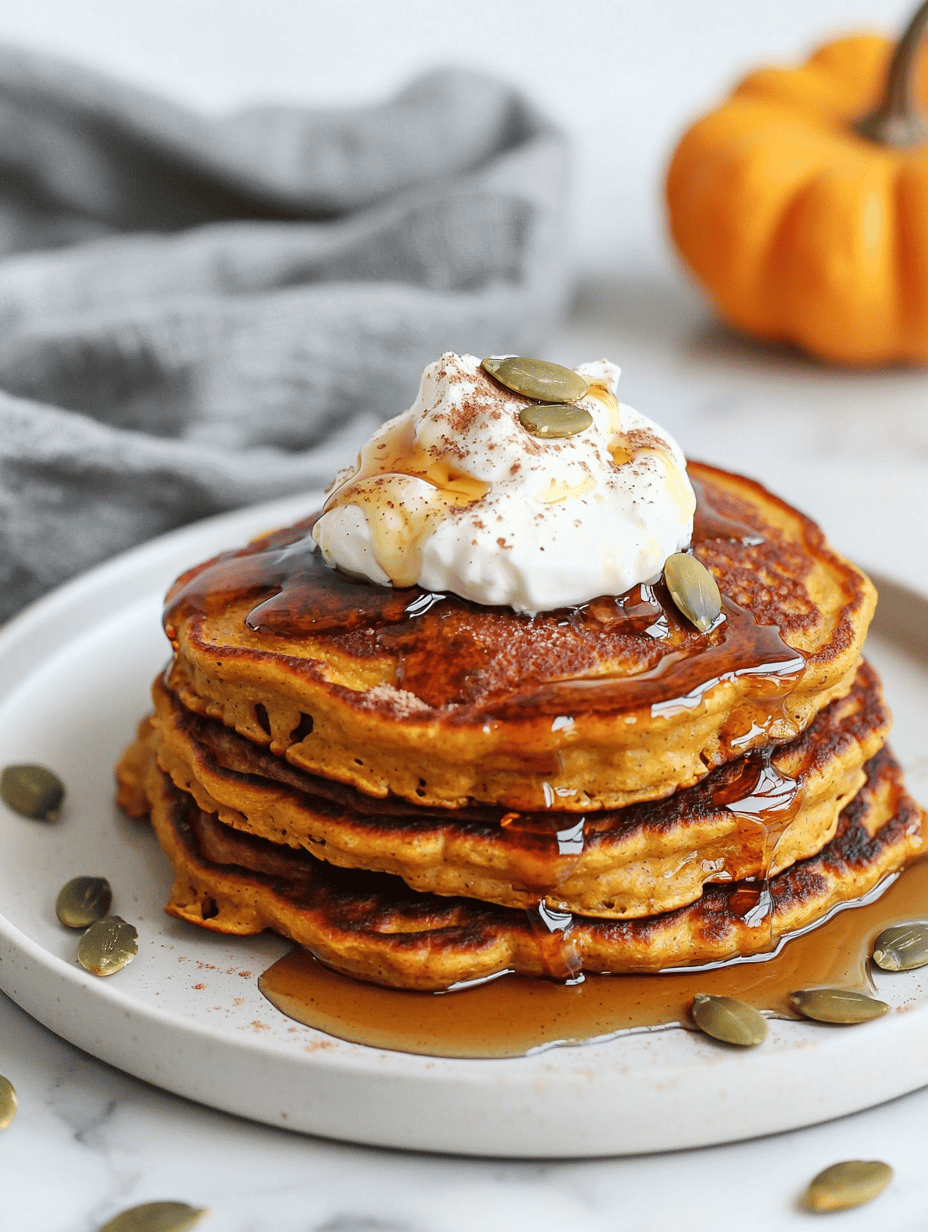
    Imagine starting your morning with a stack of fluffy pancakes infused with the gentle warmth of pumpkin. It’s not just about the taste, but how the pumpkin’s natural sweetness and earthy aroma create a comforting escape right at your breakfast table. I discovered this twist during a chaotic Sunday kitchen adventure, and it’s become a ritual I cherish each fall.

    But here’s the kicker: this recipe is about more than just flavor. It’s a sneaky way to sneak extra nutrients into your family’s morning without anyone noticing. The pumpkin keeps the pancakes moist and tender, while adding a subtle golden hue that makes every bite a delight. Plus, it’s a chance to bring some cozy autumn vibes into your daily routine.

    Pumpkin Pancakes

    These pumpkin pancakes are made by mixing a moist pumpkin batter with flour, eggs, and spices, then cooking the batter on a griddle until golden brown. The final pancakes have a fluffy, tender texture with a subtle orange hue and a warm, spiced aroma, perfect for autumn mornings.
    Prep Time 10 minutes
    Cook Time 15 minutes
    Total Time 25 minutes
    Servings: 4
    Course: Main Course
    Cuisine: American
    Calories: 250

    Ingredients
      

    • 1 ½ cups all-purpose flour
    • 1 cup pumpkin puree unsweetened
    • 2 large eggs
    • cup milk
    • ¼ cup brown sugar
    • ¼ cup unsalted butter melted
    • 1 ½ teaspoons baking powder
    • ½ teaspoon baking soda
    • 1 teaspoon ground cinnamon
    • ½ teaspoon ground ginger
    • ¼ teaspoon ground nutmeg
    • ¼ teaspoon salt

    Equipment

    • Mixing bowls
    • Whisk
    • Griddle or non-stick skillet
    • Spatula
    • Measuring cups and spoons

    Method
     

    1. In a large mixing bowl, whisk together the flour, baking powder, baking soda, cinnamon, ginger, nutmeg, and salt until well combined.
    2. In a separate bowl, beat the eggs and then stir in the pumpkin puree, milk, brown sugar, and melted butter until the mixture is smooth and homogeneous.
    3. Pour the wet ingredients into the dry ingredients and gently fold them together using a spatula until just combined. Do not overmix; the batter should be slightly lumpy.
    4. Preheat a griddle or non-stick skillet over medium heat and lightly grease it with butter or oil.
    5. Pour ¼ cup of batter onto the hot skillet for each pancake. Cook until bubbles appear on the surface and the edges look set, about 2-3 minutes.
    6. Flip the pancakes carefully using a spatula and cook for another 2 minutes until golden brown and cooked through.
    7. Remove the cooked pancakes from the skillet and keep warm while you repeat with remaining batter.
    8. Serve the pumpkin pancakes warm, topped with syrup, whipped cream, or your favorite fall toppings.

    As the season shifts, these pumpkin pancakes are a reminder to slow down and savor the little moments. The blend of spices, the aroma, and the warm bite evoke a sense of nostalgia for autumn mornings long gone.

    They’re perfect for lazy weekends or a quick weekday breakfast that feels special. No matter the day, this recipe offers a slice of seasonal comfort with every stack. Sometimes, it’s the simplest things that bring the most joy.

  • Charming Halloween Candy Corn Parfaits: A Nostalgic Twist

    Charming Halloween Candy Corn Parfaits: A Nostalgic Twist

    As spooky season settles in, I find myself craving that perfect blend of sweet and chaotic. These Candy Corn Parfaits aren’t just adorable—they’re a whimsical throwback to childhood Halloween excitement. Layered with vibrant colors and creamy textures, they turn everyday desserts into a playful celebration of fall.

    I decided to ditch the usual cupcakes and go for something that feels a little more surprising and shareable. The crunch of graham cracker crumbs paired with the mellow richness of whipped cream really captures that festive spirit. Plus, they demand no oven—just a few simple steps and a sprinkle of fun.

    Candy Corn Parfaits

    Candy Corn Parfaits are layered desserts featuring creamy whipped topping, crunchy graham cracker crumbs, and vibrant candy corn toppings. They are assembled in clear glasses to showcase the colorful layers, resulting in a sweet, textured treat with a festive appearance. The parfaits require no baking and come together quickly with simple ingredients.
    Prep Time 10 minutes
    Total Time 10 minutes
    Servings: 4
    Course: Main Course
    Cuisine: American
    Calories: 250

    Ingredients
      

    • 1 cup heavy whipping cream chilled
    • 2 tbsp granulated sugar optional, for sweetness
    • 1 tsp vanilla extract
    • 1 cup graham cracker crumbs
    • 0.5 cup candy corn for decoration

    Equipment

    • Clear glasses or dessert cups
    • Mixing bowls
    • Whisk
    • Spoon

    Method
     

    1. Whisk the chilled heavy cream in a mixing bowl until soft peaks form, then gently add sugar and vanilla, continuing to whisk until stiff peaks develop and the mixture is creamy and smooth.
    2. Spoon a layer of graham cracker crumbs into the bottom of each glass to create a crunchy base.
    3. Divide the whipped cream evenly among the glasses and gently spoon it over the graham cracker layer, smoothing the top with the back of a spoon.
    4. Add another layer of graham cracker crumbs on top of the whipped cream for added crunch and structure.
    5. Spoon the remaining whipped cream over the second layer, smoothing it out for an even surface.
    6. Sprinkle candy corn on top of each parfait, creating a colorful, festive topping that is both eye-catching and sweetly thematic.

    Notes

    Serve immediately to keep the whipped cream light and the candy corn fresh. You can prepare the layers ahead of time and refrigerate until ready to serve.

    These parfaits are a reminder that treats don’t have to be complicated to be memorable. They bring a pop of color and a splash of nostalgia to any Halloween table, making even the simplest gathering feel special.

    Enjoy layering these delights and watching faces light up. The mix of textures, the sweet, buttery aroma, and all that cheerful color make them perfect for any spooky celebration or cozy movie night.

  • Frozen Margarita Slushie: A Cool Twist on a Classic

    Frozen Margarita Slushie: A Cool Twist on a Classic

    As the summer heat peaks, I find myself craving a frozen treat that hits all the right notes—refreshing, tangy, with a hint of boozy chill. The frozen margarita slushie is my unexpected go-to when I want something simple yet indulgent, but with an unusual twist. It’s like a vacation in a glass, perfect for spontaneous backyard gatherings or solo afternoons soaking up the sun.

    This recipe transforms the classic cocktail into a icy, slushy delight that’s surprisingly easy to whip up with everyday ingredients. The secret lies in just blending good tequila with lime and a touch of sweetness till smooth and icy. No blender? No problem: this can be tweaked for a handheld alternative, still delivering that icy punch.

    Frozen Margarita Slushie

    The frozen margarita slushie is an icy, lightly boozy treat made by blending tequila, lime juice, and sweetener until smooth and frosty. It has a vibrant, slushy texture and a tangy flavor profile, resembling a frozen cocktail in a glass. Perfect for hot days or casual gatherings, it offers a refreshing and indulgent escape.
    Prep Time 10 minutes
    Total Time 10 minutes
    Servings: 2
    Course: Main Course
    Cuisine: cocktail
    Calories: 150

    Ingredients
      

    • 1 ½ oz tequila preferably blanco or silver
    • 1 oz lime juice freshly squeezed for best flavor
    • 0.5 oz simple syrup adjust to taste for sweetness
    • 1 cup ice cubes

    Equipment

    • Blender
    • Measuring cups and spoons

    Method
     

    1. Measure out the tequila, lime juice, and simple syrup, then add them into the blender.
    2. Add the ice cubes to the blender with the liquid ingredients.
    3. Secure the lid and blend everything on high until the mixture is completely smooth and icy, about 30-45 seconds. You should see a thick, frosty texture with no ice chunks remaining.
    4. Pause the blender and check the consistency; if it’s too thick, add a splash of lime juice or tequila and blend briefly to loosen.
    5. Once the mixture is smooth and scoopable, pour the slushie into chilled glasses.
    6. Garnish with lime wedges or slices if desired, and serve immediately for the perfect icy chill.

    What makes this frozen margarita slushie stand out is its adaptable nature—you can customize the sweetness or add a splash of fruit juice for extra depth. It’s perfect for cooling down hot days or simply adding a festive refreshment to any occasion. Plus, the minimal effort means less time in the kitchen and more time savoring the chill.

    Sticky with memories of lazy summer afternoons, this recipe feels like an instant vacation. It’s a reminder that sometimes, all you need is a quick, icy sip to reset and enjoy the moment. Whether as a treat or a crowd-pleaser, it’s ready to become your new favorite frozen escape.

  • Sun-Kissed Peach Crumble: A Summer’s Sweet Escape

    Sun-Kissed Peach Crumble: A Summer’s Sweet Escape

    Theres something magical about transforming ripe summer peaches into a warm, oozing crumble. On the hottest days, this dessert becomes my refuge, blending the fresh aroma of peaches with cinnamons cozy embrace. The golden-brown topping crackles when you scoop and reveals a bubbling, juicy filling beneath.

    I love exploring how a simple crumble can evoke nostalgia while still feeling exciting. Every bite reminds me of lazy afternoons and the thrill of seasonal finds. Plus, the subtle tang of peach contrasts beautifully with the buttery, crisp toppings crunch. Its a perfect way to celebrate late summers bounty.

    Peach Crumble

    This peach crumble features ripe summer peaches baked under a golden, crispy topping. The dish is prepared by slicing and baking the fruit with sugar and spices, then topping it with a buttery crumble mixture before baking until bubbling and browned. The final texture combines tender, juicy fruit with a crunchy, crumbly topping that crackles when served.
    Prep Time 15 minutes
    Cook Time 30 minutes
    Total Time 45 minutes
    Servings: 4
    Course: Main Course
    Cuisine: American
    Calories: 250

    Ingredients
      

    • 4-5 large ripe peaches peeled, pitted, and sliced
    • 1/2 cup granulated sugar
    • 1 teaspoon ground cinnamon
    • 1/4 teaspoon salt
    • 1 cup all-purpose flour
    • 1/2 cup rolled oats
    • 1/2 cup unsalted butter cold and cubed
    • 2 tablespoons brown sugar

    Equipment

    • Baking dish
    • Mixing bowls
    • Measuring cups and spoons
    • Pastry cutter or fork

    Method
     

    1. Preheat your oven to 375°F (190°C). Lightly grease a baking dish with butter or non-stick spray.
    2. Slice the peaches into thin, even wedges, removing the pits. Place them in a mixing bowl and toss with sugar, cinnamon, and salt until evenly coated.
    3. Spread the sugared peaches evenly in the prepared baking dish, creating a level layer with no gaps.
    4. In a separate bowl, combine flour, oats, and brown sugar. Add the cold, cubed butter.
    5. Use a pastry cutter or fork to cut the butter into the dry ingredients until the mixture resembles coarse crumbs with some larger pea-sized pieces.
    6. Sprinkle the crumble mixture evenly over the peaches, covering the filling completely.
    7. Bake in the preheated oven for about 30 minutes, or until the topping turns golden brown and the filling bubbles around the edges.
    8. Remove the crumble from the oven and let it sit for a few minutes to set slightly. Serve warm, optionally with a scoop of vanilla ice cream.

    This peach crumble is more than just a dessert; its a celebration of the seasons fleeting sweetness. Each batch carries memories of sun-drenched afternoons, a reminder to savor these moments. It pairs effortlessly with vanilla ice cream or a dollop of whipped cream, adding to its irresistible charm.

    As the summer days dwindle, this humble dish becomes a little ritual. A way to enjoy the harvest one comforting spoonful at a time. No matter how many times I make it, it always feels like a small, sweet victory.

  • Spooky Glee: Halloween Dirt Cake with Gummy Worms

    Spooky Glee: Halloween Dirt Cake with Gummy Worms

    Every Halloween, I crave the mischievous delight of turning simple ingredients into something that sparks a little chaos at the dessert table. This Dirt Cake with Gummy Worms transforms nostalgic childhood treats into a spooky, edible surprise, perfect for kids and adults alike. The rich chocolate crumble, faux ‘dirt,’ is so satisfying to dig into, especially when hidden gummy worms wiggle unexpectedly.

    There’s something oddly satisfying about the textures here — the crumbled cookie and pudding layers with squishy chewy worms. It smells like chocolate and vanilla, with a sweet promise of fun that’s just waiting to be uncovered. This recipe invites you to get a little messy and embrace the chaos of Halloween festivities.

    Halloween Dirt Cake with Gummy Worms

    This dessert combines layers of creamy chocolate pudding and crushed cookies to resemble dirt, with gummy worms hidden throughout for a spooky effect. The dish is assembled in layers, resulting in a textured treat with a crumbly base, smooth pudding, and chewy gummy worms that peek out visually. It is typically served chilled, with a messy, rustic appearance ideal for Halloween festivities.
    Prep Time 20 minutes
    Total Time 20 minutes
    Servings: 8
    Course: Main Course
    Cuisine: American
    Calories: 250

    Ingredients
      

    • 1 package chocolate sandwich cookies such as Oreos, crushed into fine crumbs
    • 3 cups instant chocolate pudding mix prepared with milk according to package instructions
    • 2 cups cold milk for pudding preparation
    • 1 cup whipped topping such as whipped cream or store-bought topping
    • to taste gummy worms for hiding throughout the layers

    Equipment

    • Mixing bowls
    • Electric mixer or whisk
    • 8×8 inch serving dish or trifle bowl
    • Spoon or spatula
    • Measuring cups and spoons
    • Gummy worms

    Method
     

    1. Crush the chocolate sandwich cookies into fine crumbs using a rolling pin or food processor; set aside.
    2. In a mixing bowl, whisk together the instant chocolate pudding mix with cold milk until well combined and the mixture starts to thicken, about 2 minutes.
    3. Gently fold the whipped topping into the pudding mixture to make it creamy and fluffy.
    4. Spread a layer of crushed cookies at the bottom of your serving dish, creating a ‘dirt’ base.
    5. Spoon half of the pudding mixture over the cookie layer, smoothing it into an even layer.
    6. Add gummy worms on top of the pudding layer, burying some slightly into the pudding for a hidden effect.
    7. Repeat with remaining crushed cookies and pudding, creating additional layers and hiding more gummy worms as desired.
    8. Finish with a final sprinkle of cookie crumbs on top to resemble fresh dirt, and insert remaining gummy worms for a spooky touch.
    9. Cover the dish and refrigerate for at least 2 hours to allow flavors to meld and the texture to set.
    10. Once chilled, serve the dirt cake with extra gummy worms on top if desired, and enjoy the playful, gooey texture and chocolaty flavor.

    As the final layer is added and the gummy worms peek out, this dessert becomes more than just a treat—it’s a conversation starter. The playful presentation makes it perfect for a festive table, and the creamy, crunchy textures keep everyone coming back for more. Plus, it’s so easy to assemble, you’ll have time for last-minute spooky decorations or costume prep.

    This dirt cake is the yearly reminder that simple ingredients, when turned into something whimsical, can create the most memorable moments. It’s a favorite that captures the essence of Halloween — fun, unpredictable, and a little bit gross in the best way. Enjoy the chaos and savor every squishy, chocolaty bite.

  • Unearth the Secret Layers of Eggplant Parmesan

    Unearth the Secret Layers of Eggplant Parmesan

    Many see Eggplant Parmesan as just comfort food, but to me, it’s an exploration of texture and flavor that tells a story of culinary heritage. The process of transforming tender eggplant slices into crispy, golden layers beneath bubbling marinara is almost meditative. It’s a dish that carries the whispers of old Italian kitchens and the chaos of home cooking, blended into one.

    Tonight, I want to share a version that’s not just about the flavors but about capturing that little spark of joy in the messy, imperfect process. The secret isn’t in the complex ingredients but in the love stirred into each step. It’s a dish that reminds us why we cook — to create something truly nourishing, both for the palate and the soul.

    Eggplant Parmesan

    Eggplant Parmesan features tender slices of eggplant coated in breadcrumbs and baked until crispy, layered with marinara sauce and melted cheese. The dish has a crispy exterior with a soft, flavorful interior, and a bubbling, golden appearance upon finishing. It combines baking and layering techniques to create a hearty, visually appealing main course.
    Prep Time 20 minutes
    Cook Time 40 minutes
    Total Time 1 hour
    Servings: 4
    Course: Main Course
    Cuisine: Italian
    Calories: 350

    Ingredients
      

    • 2 large eggplants sliced into 1/4-inch thick rounds
    • 1 cup breadcrumbs preferably panko for extra crunch
    • 1/2 cup grated Parmesan cheese optional for coating
    • 2 cups marinara sauce store-bought or homemade
    • 2 cups shredded mozzarella cheese for topping
    • 2 eggs eggs beaten
    • 1 teaspoon salt for seasoning
    • 0.5 teaspoon black pepper to taste
    • 1 cup olive oil for greasing and baking

    Equipment

    • Baking sheet
    • Shallow bowls
    • Cooking Tongs
    • Grater
    • Kitchen towel or paper towels

    Method
     

    1. Preheat your oven to 400°F (200°C) and lightly grease a baking sheet with olive oil.
    2. Place the eggplants on a clean kitchen towel or paper towels and sprinkle with salt. Let sit for 10 minutes to draw out excess moisture, then pat dry.
    3. Set up a coating station with beaten eggs in one shallow bowl, and in another bowl, mix breadcrumbs with Parmesan cheese, salt, and pepper.
    4. Dip each eggplant slice into the beaten eggs, letting excess drip off, then coat thoroughly in the breadcrumb mixture, pressing lightly to adhere.
    5. Arrange the breaded eggplant slices on the prepared baking sheet in a single layer, leaving space between each piece.
    6. Bake the eggplant slices for about 20 minutes, flipping halfway through, until they are golden brown and crispy around the edges.
    7. Once baked, remove the eggplant from the oven and lower the oven temperature to 375°F (190°C).
    8. Spread a thin layer of marinara sauce in the bottom of a baking dish, then layer baked eggplant slices over the sauce.
    9. Spread more marinara sauce over the eggplant layer, then sprinkle with shredded mozzarella cheese.
    10. Repeat the layering process — eggplant, sauce, cheese — until all ingredients are used, finishing with a generous layer of cheese on top.
    11. Bake uncovered for 25-30 minutes, or until the cheese is bubbly and golden brown, and the edges are crispy.
    12. Remove from the oven and let rest for 5 minutes before serving. Serve hot, garnished with fresh herbs if desired.

    Eggplant Parmesan is a dish that’s perfect for those cozy nights when comfort feels like the only priority. Its warm, cheesy layers make the kitchen smell inviting, a signal that something special is in progress. It’s easy to fall into a rhythm of making this dish again and again, each time discovering a new nuance in its simple charm.

    As the season changes, this recipe adapts beautifully — whether it’s a casual family dinner or a special gathering. It’s more than food; it’s a memory, a ritual, a conversation starter that brings everyone to the table with smiles. Sometimes, that’s just the magic we need.

  • Unexpected Pumpkin Bread Twist That Will Surprise Your Senses

    Unexpected Pumpkin Bread Twist That Will Surprise Your Senses

    Imagine combining the nostalgic aroma of cinnamon with the unexpected zest of fresh ginger in your pumpkin bread. This recipe takes a classic fall favorite and elevates it with a splash of citrus zest, making each bite vibrant and refreshing. It’s perfect for those cozy mornings when you crave something familiar yet exciting.

    In this journey of baking, I chase textures that dance between moist and crumbly, with a scent that triggers memories of pumpkin patches and warm kitchens. The secret ingredient is a handful of crunchy walnuts, adding a delightful surprise in every forkful. Let’s explore how this bread can turn an ordinary brunch into a celebration of flavors.

    ## WHY I LOVE THIS RECIPE?
    – It’s a perfect blend of comfort and surprise with every slice.
    – The citrus zest lifts the pumpkin’s earthy sweetness in a vibrant way.
    – I love the quick prep that makes this bread ideal for impromptu gatherings.
    – The smell alone fills my home with autumn’s warmth and spice.
    – Every batch reminds me of childhood festivals and crisp fall air.

    ## AVOID MY DISASTER (You’re Welcome)
    – FORGOT to grease the loaf pan? The bread stuck, a quick sprinkle of baking spray fixes it.
    – DUMPED too much nutmeg? It overwhelmed the pumpkin flavor; dilute with a splash of milk in the batter.
    – OVER‑TORCHED the crust? Wrap the bread in foil halfway through baking to save it.
    – LEFT the oven door ajar? The temperature drops and affects rising, close it tight for perfect height.

    ## QUICK FIXES THAT SAVE YOUR DAY
    – If batter is too thick, splash in a few tablespoons of buttermilk.
    – When edges burn, shield with foil and lower the oven temperature.
    – Splash some vanilla extract if the flavor feels flat.
    – Patch dry spots with a dab of butter and a sprinkle of sugar.
    – When the smell is faint, crack the oven open briefly to let in more air.

    Enjoy this pumpkin bread that’s as nuanced as a fall afternoon. Its versatility makes it a staple for brunch, teatime, or a simple treat by the fire. Each slice offers layers of spice, fruit, and crunch—an ode to seasonal comfort that’s easy to share and even easier to love.

    Spiced Pumpkin Banana Bread

    This pumpkin banana bread combines moist, tender crumb with a golden crust. It features a blend of pumpkin puree, ripe bananas, and warm spices, with crunchy walnuts providing added texture. The batter is mixed, poured into a loaf pan, baked until fragrant and golden, resulting in a flavorful, sliceable bread with a inviting appearance.
    Prep Time 15 minutes
    Cook Time 1 hour
    Total Time 1 hour 15 minutes
    Servings: 8
    Course: Main Course
    Cuisine: American
    Calories: 250

    Ingredients
      

    • 1 1/2 cups all-purpose flour sifted
    • 1 cup granulated sugar
    • 1/2 cup unsalted butter melted
    • 2 ripe bananas mashed
    • 1/2 cup pumpkin puree
    • 2 large eggs
    • 1 1/2 teaspoons baking soda
    • 1 teaspoon ground cinnamon
    • 1/2 teaspoon ground nutmeg
    • 1/2 teaspoon salt
    • 3/4 cup chopped walnuts optional, for crunch

    Equipment

    • Mixing bowls
    • Loaf pan

    Method
     

    1. Preheat your oven to 350°F (175°C). Grease the loaf pan with butter or non-stick spray and set aside.
    2. In a large mixing bowl, whisk together the eggs, melted butter, and sugar until well combined and slightly fluffy.
    3. Add the mashed bananas and pumpkin puree to the mixture. Stir until evenly incorporated, and the batter looks slightly thick and homogeneous.
    4. In a separate bowl, whisk together the sifted flour, baking soda, cinnamon, nutmeg, and salt to distribute the spices evenly.
    5. Gradually fold the dry ingredients into the wet mixture using a spatula or wooden spoon, just until no streaks of flour remain—be gentle to avoid overmixing.
    6. Stir in the chopped walnuts for added crunch and flavor. The batter should be thick but scoopable.
    7. Pour the batter evenly into the prepared loaf pan, smoothing the top with a spatula so it bakes uniformly.
    8. Bake in the preheated oven for about 60 minutes, or until the top is golden brown and a toothpick inserted into the center comes out clean.
    9. Once baked, remove the bread from the oven and let it cool in the pan for 10 minutes. Then transfer to a wire rack to cool completely before slicing.
    10. Slice the bread to reveal its moist crumb with swirls of spice and crunchy walnuts on top. Serve warm or at room temperature for a delicious treat.

    Notes

    For a richer flavor, toast the walnuts lightly before folding into the batter. Store leftovers in an airtight container for up to 3 days. You can also freeze slices for later enjoyment.
    Baking this pumpkin bread offers more than just a tasty treat; it’s a small ritual that anchors us to the changing seasons. As the kitchen fills with warm spices and toasted nuts, I find a moment of calm amid busy days.

    This recipe is a reminder that simple ingredients, combined thoughtfully, turn into moments of joy. Whether it’s for a quiet breakfast or a festive gathering, it never fails to bring a little comfort and cheer.

  • Sun-Kissed Watermelon Slushie: A Cool Twist for Bright Days

    Sun-Kissed Watermelon Slushie: A Cool Twist for Bright Days

    Ever wondered how to turn a simple watermelon into a refreshing masterpiece that captures the essence of summer? This watermelon slushie is not just about hydration; it’s about experiencing the sweet, juicy burst of watermelon infused with a hint of mint that makes every sip feel like a breeze. The best part? It’s so straightforward that even the busiest days can turn into a mini celebration.

    Imagine standing in your kitchen, hearing the crunch of ice, smelling the sweet aroma of ripe watermelon, and then blending it all into a frosty dream. This recipe isn’t just a drink; it’s a mini escape, perfect for sunny afternoons or last-minute gatherings. It’s a cool, vibrant reminder that summer’s simple pleasures are often the most satisfying.

    Watermelon Mint Slushie

    This watermelon slushie combines pureed ripe watermelon with crushed ice and fresh mint leaves to create a chilled, refreshing beverage. The mixture results in a vibrant, icy drink with a smooth, slushy texture and bright, fruity flavor. It’s perfect for hot summer days and easy to prepare with simple blending techniques.
    Prep Time 10 minutes
    Total Time 10 minutes
    Servings: 2
    Course: Main Course
    Cuisine: Summer
    Calories: 80

    Ingredients
      

    • 4 cups ripe watermelon chunks seedless if possible
    • 1 cup crushed ice or more as needed
    • 8 fresh mint leaves mint leaves plus extra for garnish

    Equipment

    • Blender
    • Knife
    • Cutting board

    Method
     

    1. Cut the ripe watermelon into smaller chunks, removing any seeds if necessary, and place them into the blender.
    2. Add the fresh mint leaves to the blender with the watermelon.
    3. Pour in the crushed ice onto the watermelon and mint in the blender.
    4. Secure the lid on the blender and blend everything on high until the mixture is smooth and frosty, about 30-45 seconds.
    5. Pour the vibrant pink slushie into chilled glasses, watching it turn into a thick, icy beverage.
    6. Garnish each glass with a sprig of fresh mint for an aromatic and visual finishing touch.

    Notes

    For an extra burst of flavor, add a squeeze of lime before blending. Adjust the amount of crushed ice for desired thickness.
    As the watermelon slushie melts in your glass, it’s hard not to smile at how easy and fun summer treats can be. This recipe is a testament to that perfect combo of natural sweetness and icy refreshment, ideal for any warm day.

    Whether you’re lounging in a hammock or rushing through a hot afternoon, this slushie delivers a quick respite. Its vibrant color and fresh flavor make it impossible to resist. So next time you’re craving something cold, give this a whirl — your taste buds will thank you.

  • Transform Your Fall Mornings with an Unusual Pumpkin Muffin Twist

    Transform Your Fall Mornings with an Unusual Pumpkin Muffin Twist

    The aroma of pumpkin spice wafting through my kitchen instantly transports me back to childhood autumns, but this recipe adds a surprising twist. Instead of just relying on cinnamon and nutmeg, I infuse these muffins with a hint of Earl Grey tea leaves, creating a unique, zesty depth. It’s a cozy, sophisticated upgrade that makes your breakfast feel like an indulgent secret.

    As the leaves turn and the weather cools, baking becomes my seasonal ritual—yearning for that perfect balance of moist crumb and spicy fragrance. These pumpkin muffins don’t just satisfy hunger; they spark a little adventure in the routine, making every bite a conversation between tradition and novelty. They’re great for casual mornings or a quick, impressive brunch treat.

    Pumpkin Earl Grey Muffins

    These muffins combine the warm, spicy flavors of pumpkin and traditional autumn spices with the subtle citrus and floral notes of Earl Grey tea. They are baked until golden on the outside with a moist, tender crumb inside, showcasing a delicate balance of spice and tea-infused aroma. The result is a visually appealing, fluffy muffin with a slightly domed top and speckled with tea leaves.
    Prep Time 15 minutes
    Cook Time 20 minutes
    Total Time 35 minutes
    Servings: 12
    Course: Main Course
    Cuisine: Autumn
    Calories: 220

    Ingredients
      

    • 1 3/4 cups all-purpose flour
    • 1 cup granulated sugar
    • 1/2 cup pumpkin puree unsweetened
    • 1/2 cup vegetable oil
    • 2 large eggs
    • 1 teaspoon baking powder
    • 1/2 teaspoon baking soda
    • 1/2 teaspoon ground cinnamon
    • 1/4 teaspoon ground nutmeg
    • 1 teaspoon Earl Grey tea leaves finely chopped if whole
    • 1/4 teaspoon salt

    Equipment

    • Mixing bowls
    • Whisk
    • Muffin tin
    • Paper liners or greasing utensil

    Method
     

    1. Preheat your oven to 375°F (190°C) and line a muffin tin with paper liners or lightly grease it.
    2. In a large mixing bowl, whisk together the flour, sugar, baking powder, baking soda, spices, salt, and chopped Earl Grey tea leaves until well combined.
    3. In a separate bowl, beat the eggs, then stir in the pumpkin puree and vegetable oil until smooth and homogeneous.
    4. Pour the wet mixture into the dry ingredients, gently folding them together with a spatula until just combined. Do not overmix to keep the muffins tender.
    5. Spoon the batter evenly into the prepared muffin cups, filling each about three-quarters full.
    6. Bake in the preheated oven for 20 minutes, or until the muffins are golden on top and a toothpick inserted into the center comes out clean.
    7. Remove the muffins from the oven and let them cool in the tin for a few minutes before transferring to a wire rack to cool completely.
    8. Once cooled, enjoy these muffins with a hot cup of tea or a splash of butter for a cozy treat.
    Mixing the familiar with an unexpected ingredient, like Earl Grey, elevates the humble pumpkin muffin into something memorable. These muffins are perfect to whip up on a crisp weekend morning or to pack for a cozy picnic. They remind us that baking is about creativity, not just following a recipe.

    Enjoy these muffins with a warm cup of tea or a splash of cream—simple joys to add warmth to any busy day. Once baked, their aroma alone is enough to brighten even the gloomiest of fall mornings, turning ordinary into extraordinary.

  • The Caramel Slushie Secret: Embrace the Sweet Cold Craze

    The Caramel Slushie Secret: Embrace the Sweet Cold Craze

    As the heat creeps up and summer days turn sticky, I stumble upon unusual ways to keep cool. This caramel slushie isn’t just a frozen treat; it’s a nostalgic whisper of childhood mixed with a daring twist of rich caramel flavor. I love how it transforms a simple icy drink into an indulgence that feels like a small celebration in every sip.

    There’s an art to balancing the cold and the caramel’s deep sweetness without turning the entire thing into sticky chaos. It’s surprisingly easy, but mastering that perfect velvety texture keeps me hooked. Plus, the aroma of caramel gently heating up as you blend adds an unexpected cozy touch to an otherwise chill creation.

    **WHY I LOVE THIS RECIPE?**

    • Joy of blending rich caramel with icy freshness in one glass.
    • Relief from the relentless summer heat with minimal effort.
    • Peek into my childhood days with a grown-up caramel twist.
    • I pride myself on creating DIY frozen treats that feel fancy.

    **AVOID MY DISASTER (You’re Welcome)**

    • FORGOT to chill the caramel syrup? It’s harder to blend smoothly—reheat and cool again.
    • DUMPED hot caramel into ice? It clumped into a sticky mess—wait till cooled slightly.
    • OVER‑TORCHED the sugar? It turned bitter—start fresh with a clean pan.
    • MISSED the ice-to-liquid ratio? Your slushie will be soupy—add more ice and blend again.

    **QUICK FIXES THAT SAVE YOUR DAY**

    • When texture is off, SPLASH in a bit of cold milk for creaminess.
    • Patch up sweetness with a pinch of sea salt—brings out caramel’s richness.
    • Shield your blender from overheating—pause every 30 seconds.
    • When in doubt, add one more handful of ice—crackles as it crushes.
    • For a quick fix, microwave slightly melted caramel—shimmering and smoothens instantly.

    Caramel Slushie

    This caramel slushie combines rich caramel syrup with crushed ice to create a frozen treat with a smooth, velvety texture. The mixture results in a creamy, icy beverage that showcases a deep caramel flavor, with a glossy appearance and a soft, slushy consistency.
    Prep Time 5 minutes
    Total Time 5 minutes
    Servings: 2
    Course: Main Course
    Cuisine: American
    Calories: 150

    Ingredients
      

    • 1/4 cup caramel syrup preferably smooth and cooled slightly
    • 2 cups ice cubes crushed or whole, enough to blend into slush
    • 1/4 cup milk add for creaminess if needed

    Equipment

    • Blender
    • Measuring Spoons

    Method
     

    1. Pour the caramel syrup into the blender, making sure it’s smooth and slightly cooled to avoid clumping.
    2. Add the ice cubes to the blender, filling it about three-quarters full to create a thick, icy base for the slushie.
    3. Pour in the milk to help blend the ice smoothly, adding a little more if the mixture seems too thick or starting to clump.
    4. Secure the lid on the blender and blend everything on high speed for about 30-45 seconds, until the mixture is thick, smooth, and velvety, with a glossy appearance.
    5. Stop the blender and check the texture — it should be creamy yet scoopable; if it’s too slushy, add a few more ice cubes and blend briefly.
    6. Pour the caramel slushie into chilled glasses, and garnish if desired with a drizzle of caramel or a light sprinkle of sea salt for extra flavor.
    7. Savor immediately with a straw or spoon, enjoying the cool, rich caramel flavor and the satisfying slushy texture.
    This caramel slushie is a fun diversion from the usual summer drinks, and it’s so easy to customize. Whether you add a splash of sea salt or a hint of vanilla, it’s your own frozen caramel canvas. As the season heats up, I find comfort in these little iced moments of joy, each sip cooling and sweet.