Blog

  • Spooky Chic: Halloween Eyeball Caprese Bites

    Spooky Chic: Halloween Eyeball Caprese Bites

    What excites me most is how these bites transform classic Caprese into tiny eyeballs that look almost too good to eat—until you take a bite! They’re a playful mix of chaos and charm, perfect for unexpected guests or a surprise treat during trick-or-treating. Plus, the combination of fresh herbs and ripe tomatoes makes my kitchen smell like a garden in full bloom.

    Caprese Eyeball Bites

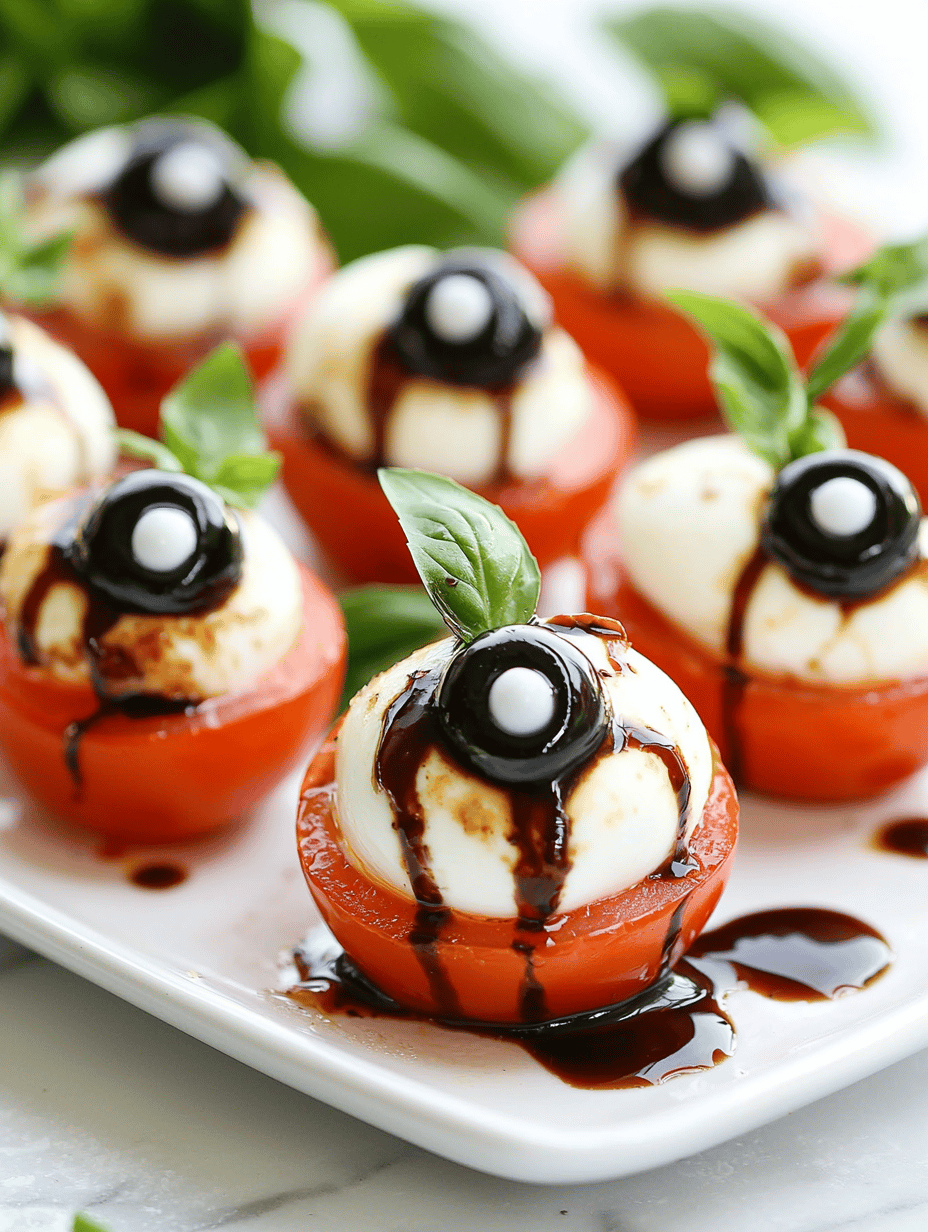
    These Caprese eyeball bites are composed of fresh cherry tomatoes topped with mozzarella balls, decorated to resemble tiny eyeballs. They are assembled by stacking ingredients and garnished with herbs, resulting in a playful appetizer with a smooth, firm texture and vibrant appearance.
    Prep Time 15 minutes
    Total Time 15 minutes
    Servings: 8
    Course: Main Course
    Cuisine: International
    Calories: 60

    Ingredients
      

    • 16 pieces cherry tomatoes preferably firm and ripe
    • 16 pieces mozzarella balls small fresh mozzarella, about 1-inch diameter
    • fresh basil leaves a few fresh basil for garnishing and decorating
    • olive oil as needed extra virgin olive oil for drizzling
    • salt to taste sea salt
    • black pepper to taste freshly ground black pepper

    Equipment

    • Small knife
    • Cutting board
    • Toothpicks or Small Skewers
    • Serving platter

    Method
     

    1. Start by rinsing the cherry tomatoes and patting them dry. Carefully slice off a small, flat part from the bottom of each tomato to help them sit upright without wobbling.
    2. Gently insert a toothpick or small skewer into each tomato, piercing near the top where it will act as the ‘pupil’ for your eyeball.
    3. Place a mozzarella ball onto the toothpick, pressing lightly to secure it onto the tomato, resembling the white of the eye with the toothpick as the iris stalk.
    4. Garnish the top of each mozzarella with a tiny basil leaf, pressing gently so it looks like an iris or colorful vein.
    5. Arrange the assembled eyeball bites on a serving platter, spacing them out for visual effect.
    6. Drizzle a little olive oil over the bites, then sprinkle with a pinch of sea salt and freshly ground black pepper to enhance flavor.
    7. Optionally, add additional basil leaves around the platter for decoration and extra flavor.
    8. Serve immediately to enjoy the fresh, firm texture of the tomatoes and mozzarella, with the herb garnish providing a burst of aroma and color.

    Notes

    For a more realistic eyeball effect, vary the sizes of mozzarella or add small streaks of balsamic glaze as ‘veins.’ Use fresh, ripe ingredients for the best appearance and flavor.
    As the season turns chilly and the nights grow longer, these little eyeballs remind us that the fun is in the details. They add a whimsical grace to your Halloween festivities while satisfying those craving fresh, cheesy bites. No matter how spooky the night, they’ll be a memorable centerpiece for your celebration.

  • Frosty Lemonade Slushie: A Cool Escape from Heat

    Frosty Lemonade Slushie: A Cool Escape from Heat

    When summer hits its stride, my kitchen transforms into a test lab for cold, refreshing treats. This lemonade slushie isnt just a drink; its a nostalgic whirl of sour and sweet frozen into a chilly cascade. I remember making this with my grandmother, the air thick with the scent of lemon zest and sugar.

    But what makes this version stand out isnt just the traditional tang. Its a playful twist on a classic, with a hint of mint and a splash of sparkling water to add a lively sparkle. Its a celebration of simplicity and summer’s bounty captured in a glass, perfect for hot afternoons or unexpected guests.

    Lemonade Mint Slushie

    This lemonade slushie combines fresh lemon juice, sugar, and mint leaves blended with ice to create a frozen, icy beverage. The final texture is a smooth, slushy mixture with a bright lemon flavor and a refreshing mint finish, topped with sparkling water for a lively sparkle.
    Prep Time 10 minutes
    Total Time 10 minutes
    Servings: 4
    Course: Main Course
    Cuisine: American
    Calories: 120

    Ingredients
      

    • 1 cup fresh lemon juice preferably freshly squeezed
    • 0.75 cup granulated sugar adjust to taste
    • 1 cup fresh mint leaves about a handful
    • 4 cups ice cubes crushed or whole
    • 1 cup sparkling water chilled, for topping

    Equipment

    • Blender
    • Measuring cups and spoons
    • Citrus juicer
    • Muddler or spoon
    • Tall glasses

    Method
     

    1. Juice the lemons using a citrus juicer until you have about one cup of fresh lemon juice. Set aside.
    2. Add sugar to a small bowl and whisk until it begins to dissolve, or set aside for later addition.
    3. Muddle the mint leaves gently in a glass or mortar to release their aromatic oils.
    4. Combine the lemon juice, muddled mint, and sugar in a blender. Blend briefly until the mint is finely chopped and the sugar begins to dissolve.
    5. Add the ice cubes to the blender and blend on high until the mixture is smooth and slushy, with a frosty, icy texture.
    6. Pour the frozen mixture into tall glasses, filling them about three-quarters full.
    7. Top each glass with chilled sparkling water to add a lively fizz and refresh the flavors.
    8. Garnish with a sprig of fresh mint and a lemon wedge if desired. Serve immediately and enjoy the icy, citrusy coolness.

    Notes

    Adjust the sweetness by adding more or less sugar. For a less sweet version, reduce the sugar or use honey or agave syrup. The mint can be replaced or supplemented with basil for a different herbal note.

    This lemonade slushie isnt just a recipe; its a moment of refreshment nestled in a glass. It captures the essence of summer in every icy sip, embodying the joy of simplicity with a twist. The best part? It comes together in minutes, making it your go-to chilly treat whenever the heat rises too high.

    As the days grow longer and the air turns sticky, having this frozen lemonade ready is a relief. Its a reminder that some of the best pleasures are the simplest—bright, zesty, and perfectly chilled. Just the thing to keep cool and carry on with summers quiet magic.

  • Chill Out with a Whiskey Slushie: The Unexpected Summer Cheers

    Chill Out with a Whiskey Slushie: The Unexpected Summer Cheers

    Imagine a warm summer evening, the sun setting and a sudden craving for something icy and spirited. A whiskey slushie is just the twist your backyard gatherings need, blending smooth spirits with icy sweetness. Creating a slushie from whiskey might sound unconventional, but it’s surprisingly simple and endlessly customizable.

    What makes this recipe stand out is its nostalgic nod to childhood snow cones but with a grown-up kick. The cold, slightly melting texture of the slushie coupled with the warm aroma of whiskey offers a delightful sensory mix. This drink isn’t just refreshing—it evokes memories of carefree summer nights.

    Whiskey Slushie

    A whiskey slushie is a frozen blended drink combining smooth whiskey with sweetened ice, creating a icy, semi-liquid dessert with a vibrant, frosty appearance. The mixture is blended until smooth and served with a slushy texture, offering a refreshing and spirited summer treat.
    Prep Time 10 minutes
    Total Time 10 minutes
    Servings: 2
    Course: Main Course
    Cuisine: American
    Calories: 150

    Ingredients
      

    • 1 cup whiskey choose your preferred type
    • 2 cups ice cubes preferably crushed or small pieces
    • 2 tablespoons simple syrup adjust sweetness as desired

    Equipment

    • Blender
    • Measuring cups and spoons
    • Wine glass or cocktail cup

    Method
     

    1. Measure and pour the whiskey into the blender, filling about a quarter of the container.
    2. Add the ice cubes into the blender, spreading them evenly over the whiskey.
    3. Pour in the simple syrup, which will balance the drink’s flavors and add sweetness.
    4. Secure the lid on the blender and blend on high speed for about 30-45 seconds, until the mixture is slushy and smooth, with a slightly icy yet liquefied consistency.
    5. Stop the blender and check the texture; it should be evenly frozen with a frosty appearance, like a thick snow cone.
    6. Pour the blended whiskey slushie into chilled glasses or cocktail cups, capturing the icy, frosty look.
    7. Optionally, garnish with a twist of lemon or a cherry for visual flair.
    8. Serve immediately with a straw or small spoon to enjoy the cold, spirited sip.

    Notes

    For a sweeter drink, add more simple syrup; for a stronger flavor, increase the whiskey. Be sure to serve immediately to enjoy the optimal icy texture.

    Serving this whiskey slushie is like throwing a mini party in each glass. It’s perfect for relaxing after a long day or impressing friends with your quirky cocktail skills. As the ice melts slightly, the flavors deepen, making each sip a new experience.

    In a season full of cool beverages, this one stands out for its unexpected sophistication. Sometimes, the simplest ideas—like frozen whiskey—bring the most joy. Cheers to spontaneous summer treats that turn ordinary moments into celebrations.

  • Autumn’s Hidden Treasure: Creamy Fall Pumpkin Soup

    Autumn’s Hidden Treasure: Creamy Fall Pumpkin Soup

    As the air turns crisper and leaves crunch underfoot, I find myself craving comfort that’s warm yet unexpectedly energetic. This isn’t your typical pumpkin soup; it’s a velvet-smooth, spice-kissed creation with a twist that awakens your senses. I love experimenting with fall ingredients, transforming simple pumpkins into something luxuriously imaginative.

    This recipe celebrates the unique charm of seasonal produce with a surprising splash of apple cider and a whisper of smoky paprika. It’s perfect for a dinner that feels special but requires minimal fuss. Plus, it fills the house with the warm, inviting aroma of fall that no candle can replicate.

    Spiced Pumpkin and Apple Cider Soup

    This pumpkin soup features a smooth, velvety texture with warming spices and a hint of smoky paprika. It is flavored with apple cider, which adds a subtle sweetness and depth, resulting in a comforting yet invigorating fall dish. The soup is puréed until creamy and served warm, with a visually appealing, vibrant orange color.
    Prep Time 10 minutes
    Cook Time 30 minutes
    Total Time 40 minutes
    Servings: 4
    Course: Main Course
    Cuisine: Fall
    Calories: 180

    Ingredients
      

    • 1 tablespoon olive oil
    • 1 medium onion diced
    • 2 cloves garlic minced
    • 4 cups pumpkin puree fresh or canned
    • 1 cup apple cider
    • 1 teaspoon smoked paprika
    • 1/2 teaspoon ground cinnamon
    • Salt and pepper to taste

    Equipment

    • Large pot
    • Immersion blender or regular blender

    Method
     

    1. Heat olive oil in a large pot over medium heat until shimmering. Add the diced onion and cook, stirring occasionally, until translucent and fragrant, about 5 minutes.
    2. Add the minced garlic to the pot and sauté for another minute, until it becomes fragrant and slightly golden.
    3. Stir in the pumpkin puree, smoked paprika, and cinnamon, allowing the spices to evenly coat the pumpkin and onion mixture.
    4. Pour in the apple cider and bring the mixture to a gentle simmer, stirring occasionally. Let it cook for about 10 minutes so flavors meld and the soup slightly thickens.
    5. Use an immersion blender directly in the pot to pureé the soup until smooth and velvety. Alternatively, transfer in batches to a blender and purée until creamy, then return to the pot.
    6. Season with salt and pepper to taste, then stir well to incorporate. Warm the soup briefly over low heat, ensuring it’s heated through and flavors are balanced.
    7. Serve the soup hot, garnished with a drizzle of olive oil or a sprinkle of extra smoked paprika if desired. Enjoy the rich, smooth texture and warming spice aroma.

    Notes

    This soup can be prepared ahead and reheated. For extra creaminess, swirl in a splash of coconut milk before serving.
    This creamy pumpkin soup captures the essence of fall—cozy, vibrant, and just a little bit unexpected. It’s the kind of dish that makes you feel grounded yet adventurous in your cooking. Whether it’s a weekend gather or a quiet night in, it’s sure to become a favorite.

    Making this soup reminds me that the best recipes are often simple, with a twist that keeps things interesting. The creamy texture combined with a dash of spice is satisfying without being heavy. It’s a gentle reminder that fall brings not just change in weather but a new opportunity to savor the flavors around us.

  • A Slow Cooker Secret to Perfect Chili Every Time

    A Slow Cooker Secret to Perfect Chili Every Time

    When the air turns crisp and everyone craves something cozy, I turn to a surprisingly simple but underrated trick to elevate my chili: slow cooking it for hours with a dash of unexpected spice. This method transforms humble ingredients into a deeply smoky, tender masterpiece that fills the entire house with the aroma of roasted peppers and cumin. It’s my secret weapon for busy days or when I want the house smelling like a chef’s kitchen.

    Chili often gets a bad rap for being too basic or overdone, but I see it as a canvas for experimentation. Adding a splash of coffee or a pinch of cinnamon can deepen those rich flavors, making each bowl feel like a small act of culinary magic. The slow cooker keeps everything luscious and simmering, giving you flexibility and patience in a chaotic day.

    Slow Cooker Chili with Roasted Peppers and Cumin

    This chili is made by slow cooking a mixture of ground meat, beans, and vegetables with roasted peppers and spices, resulting in a tender, smoky, and hearty dish. The slow cooking process breaks down the ingredients, creating a thick, flavorful stew with rich aroma and a velvety texture.
    Prep Time 15 minutes
    Cook Time 4 hours
    Total Time 4 hours 15 minutes
    Servings: 4
    Course: Main Course
    Cuisine: American
    Calories: 350

    Ingredients
      

    • 1 pound ground beef or preferred ground meat
    • 2 cups cooked beans such as black beans or kidney beans
    • 1 cup roasted red peppers chopped
    • 1 medium onion diced
    • 3 cloves garlic minced
    • 2 tablespoons cumin ground
    • 1 teaspoon cinnamon optional for depth
    • 1 cup tomato sauce
    • 1 tablespoon coffee optional, adds depth
    • to taste salt and pepper

    Equipment

    • Slow Cooker
    • Knife

    Method
     

    1. Begin by chopping the onion into small, even dices until it looks translucent and slightly golden around the edges.
      1 pound ground beef
    2. Heat a bit of oil in a skillet over medium heat, then add the diced onion and minced garlic, sautéing until fragrant and soft, about 3-4 minutes, filling your kitchen with a warm aroma.
      1 pound ground beef
    3. Add the ground meat to the skillet, breaking it apart with a spatula, and cook until browned and no longer pink, about 5-6 minutes.
      1 pound ground beef
    4. Transfer the cooked meat mixture into your slow cooker, along with chopped roasted peppers, cooked beans, tomato sauce, cumin, cinnamon (if using), and a splash of coffee for depth.
      1 pound ground beef
    5. Season the mixture with salt and pepper to taste, then give everything a good stir to combine all the flavors evenly.
      1 pound ground beef
    6. Cover the slow cooker with its lid and set it to low heat; let it simmer gently for 4 hours, allowing the flavors to meld and the chili to become thick and fragrant.
    7. Once scented and bubbling, carefully open the lid and give the chili a final stir, checking the seasoning and adjusting salt if needed.
    8. Spoon the hearty chili into bowls, revealing the tender, smoky mixture and thick texture, ready to be enjoyed hot.

    Notes

    Feel free to add toppings like shredded cheese, sour cream, or chopped cilantro for extra flavor.
    This recipe is perfect for those who love hearty comfort without the fuss. The slow cooker does all the heavy lifting, so your only job is to enjoy the spicy, smoky aroma wafting through your home.

    As the season shifts, nothing beats a warm, spicy bowl of chili to bring people together. It’s a versatile dish that invites personal tweaks, making each batch uniquely yours. A good chili isn’t just food; it’s a small ritual during those cooler months.

  • Chill Out with a Blue Raspberry Slushie: Beyond the Basic Blend

    Chill Out with a Blue Raspberry Slushie: Beyond the Basic Blend

    Nothing beats the chaos of blending a neon blue drink on a hot afternoon, especially when it tastes like pure childhood nostalgia. The electric hue of this blue raspberry slushie makes it stand out from regular fruit drinks, acting as a vibrant splash of color and flavor. It’s not just a refresher — it’s an experience that sparks joyful chaos during your summer hangouts.

    What makes this recipe special isn’t just the flavor but the playful unpredictability, from the frosty texture to the burst of sweet-tart raspberry. It’s perfect for parties, a quick cool-down, or simply a treat to beat the heat with a splash of color and a blast of berry. Plus, it’s insanely easy to whip up, even when the freezer feels uninspired.

    Blue Raspberry Slushie

    A vibrant, icy beverage made with raspberry syrup and crushed ice, blended to a frosty, smooth consistency. The final drink features a bright blue hue with a tart-sweet flavor profile and a slushy texture that melts in your mouth.
    Prep Time 5 minutes
    Total Time 5 minutes
    Servings: 2
    Course: Main Course
    Cuisine: Global
    Calories: 150

    Ingredients
      

    • 1 cup frozen raspberries fresh or frozen
    • 1/2 cup blue raspberry syrup adjust to taste
    • 1 cup crushed ice

    Equipment

    • Blender
    • Measuring cups
    • Ice Crusher or Blender with ice crushing function

    Method
     

    1. Add the frozen raspberries, blue raspberry syrup, and crushed ice into the blender.
      1 cup frozen raspberries, 1/2 cup blue raspberry syrup, 1 cup crushed ice
    2. Blend on high speed until the mixture is uniformly slushy and smooth, with a frosty texture and no large ice chunks.
    3. Stop the blender and check the consistency; if it’s too thick, add a splash of water and blend briefly to loosen it up.
    4. Pour the icy blue raspberry mixture into tall glasses, filling them just to the rim.
    5. Garnish with fresh raspberries or a sprig of mint for a colorful finishing touch.
    6. Serve immediately with a straw, and enjoy the bright, icy burst of berry flavor.
    This blue raspberry slushie is more than just a frozen drink. It taps into the nostalgic joy of childhood treats, powered up with a splash of vibrant color and flavor. Perfect for sunny days, social gatherings, or when you just need a fun way to cool off, it’s one recipe you’ll want to keep on hand.

    Whether you’re adding a splash of sparkle or swapping ingredients, this treat adapts to whatever you have in the pantry. It’s a playful, crowd-pleasing refreshment that makes every sip a tiny celebration of chaos and color.

  • The Cherry Trick: Frozen Summer Bliss with a Twist

    The Cherry Trick: Frozen Summer Bliss with a Twist

    When summer hits its peak, I love diving into unexpected ways to cool down. This cherry slushie isn’t just a drink; it’s a little rebellion against the usual iced coffees and lemonades. Its vibrant red hue and burst of frozen cherry flavor make it feel like a secret scoop of summer in each sip.

    What makes this cherry slushie stand out is the way a simple fruit transforms into a chilled adventure. I often find myself craving this at sunset, when the air is warm but not oppressive. It’s like capturing the essence of a cherry orchard but freeze-dried into a refreshing splash of cold joy.

    WHY I LOVE THIS RECIPE?

    • I adore how it turns humble cherries into a stunning icy treat.
    • The mix of sweet and tart is a nostalgic throwback to childhood joys.
    • It’s outrageously simple—just a handful of ingredients and a blender.
    • Every sip refreshes and sparks a little chaos on a scorching day.
    • The bright red color makes it feel like a playful art project for my glass.

    AVOID MY DISASTER (You’re Welcome)

    • FORGOT to freeze the cherries overnight, resulting in a thin slush. Freeze at least 4 hours.
    • DUMPED too much syrup, making it overly sweet. Keep the syrup measurement in check.
    • OVER-TORCHED the ice in the blender—causes splatters and a no-go. Use short pulses.
    • ACCIDENTALLY used hot water instead of cold, melting the ice fast. Always start with cold ingredients.

    QUICK FIXES THAT SAVE YOUR DAY

    • When the texture is too watery, add a handful of frozen bananas for creaminess.
    • Splash some lemon juice to balance overly sweet flavors.
    • Patch flavor with a dash of vanilla extract for complexity.
    • Shield your blender with towels if the ice causes loud noise and splatter.
    • When in doubt, re-freeze the mixture in a tall glass to thicken.

    As summer’s warmth continues to spread, having a batch of this cherry slushie ready feels like a small victory. Its bright flavor and icy crunch are perfect for spontaneous gatherings or just a moment of solo refreshment.

    It’s a simple reminder that sometimes the best ideas come from a handful of frozen fruit and a bit of chaos in the kitchen. With this recipe, I get to indulge in a fruity escape that’s quick, colorful, and utterly satisfying.

    Cherry Slushie

    A refreshing icy beverage made by blending frozen cherries with sweetener and ice, resulting in a vibrant red, semi-frozen treat with a smooth, slushy texture. The process involves freezing cherries, then blending until smooth and icy to create a cooling summer drink.
    Prep Time 10 minutes
    Cook Time 5 minutes
    Total Time 15 minutes
    Servings: 2
    Course: Main Course
    Cuisine: International
    Calories: 120

    Ingredients
      

    • 2 cups frozen cherries pitted and frozen overnight
    • 2 tablespoons sweetener (sugar syrup or honey) adjust to taste
    • 1 cup ice cubes crushed or whole
    • 1/4 cup cold water or cherry juice for blending

    Equipment

    • Freezer
    • Blender

    Method
     

    1. Measure out and place the frozen cherries into your blender, ensuring they were frozen overnight for the best icy texture.
    2. Add the sweetener and cold water (or cherry juice) to the blender, giving the cherries a little extra liquid to blend smoothly.
    3. Toss in the ice cubes, which will help create that signature slushy consistency and chill the mixture further.
    4. Secure the lid and start blending on low speed, gradually increasing to high, until the mixture is thick, icy, and smooth, with a vibrant red color.
    5. Stop the blender and check the texture; if it’s still too icy, blend for a few more seconds. If it’s too thick, add a splash more water or juice to loosen it up.
    6. Pour the cherry slushie into glasses, filling them to the brim, and garnish with fresh cherries or a sprig of mint if desired.

    Notes

    Ensure cherries are fully frozen before blending for the best slushie texture. Adjust sweetness based on the tartness of the cherries. Serve immediately for a truly icy experience.

    This cherry slushie isn’t just a treat; it’s a mini celebration of summer’s fleeting beauty. As the seasons shift, these cold, vibrant moments become all the more precious. It’s perfect for bringing a little joy to lazy afternoons or busy weekends alike.

    Whenever I sip this, I am transported to a place of simple pleasure—a reminder to enjoy the little things. Summer might be temporary, but the memory of a cool, sweet cherry slushie can stay fresh much longer.

  • Spooky & Savory: Halloween Mummy Meatballs with a Fun Twist

    Spooky & Savory: Halloween Mummy Meatballs with a Fun Twist

    Halloween is the perfect time to embrace the chaos in the kitchen. These Mummy Meatballs aren’t just delicious—they’re a playful way to bring some spooky charm to your table. Every bite offers a soft, juicy meatball wrapped in crispy cheese bandages, making it both a visual and taste adventure.

    I love how these little buggers turn a simple dish into a conversation starter. Perfect for parties or a creepy family dinner, they add a touch of humor and fright to the feast. Plus, they’re surprisingly easy to make, even if you’re running behind on costume prep.

    Mummy Meatballs

    Mummy Meatballs are baked or cooked meatballs made from ground meat mixed with seasonings, formed into small spheres, and wrapped with strips of melted or crispy cheese to resemble bandages. The final dish features tender, juicy meatballs with crispy cheese strips that mimic mummy wrappings, creating a playful and spooky presentation suitable for Halloween parties.
    Prep Time 20 minutes
    Cook Time 25 minutes
    Total Time 45 minutes
    Servings: 4
    Course: Main Course
    Cuisine: American
    Calories: 250

    Ingredients
      

    • 1 pound ground beef or turkey, chicken, or plant-based alternative
    • 1 cup bread crumbs to help bind the meatballs
    • 1 egg egg for binding
    • 2 cloves garlic minced
    • 1 teaspoon salt
    • 1/2 teaspoon black pepper
    • 8 ounces cheddar cheese shredded or sliced thinly for wrapping

    Equipment

    • Baking sheet
    • Parchment paper
    • Bowl
    • Meat scoop or spoon
    • Cheese grater or shreds
    • Oven

    Method
     

    1. Preheat the oven to 400°F (200°C) and line a baking sheet with parchment paper.
    2. In a large bowl, combine the ground meat, bread crumbs, egg, minced garlic, salt, and pepper. Mix everything together gently until well incorporated, being careful not to overmix.
    3. Use a scoop or spoon to portion out the meat mixture into small, uniform balls, about the size of a golf ball.
    4. Place the meatballs evenly spaced on the prepared baking sheet. Bake in the oven for 15-20 minutes until they are cooked through and lightly browned.
    5. While the meatballs are baking, shred the cheddar cheese into thin strips or cut into small slices to resemble bandages.
    6. Once the meatballs are cooled slightly, wrap each meatball with thin strips of cheese, creating a mummy-like bandage effect.
    7. If desired, place the wrapped meatballs back in the oven for an additional 3-5 minutes until the cheese is melted and slightly crispy at the edges.
    8. Arrange the finished mummy meatballs on a platter and serve immediately as a fun, spooky appetizer or main dish.

    Notes

    For a more dramatic effect, add small edible eyes made from tiny dollops of cream cheese or olives.
    As the final creepy touches are added to your spooky platter, I hope these Mummy Meatballs bring some fun to your celebration. They’re a reminder that cooking can be as creative as the costumes and decorations we love about Halloween. Enjoy every bite and every giggle around the table.

    This recipe is perfect for late-night munching or a quick crowd-pleaser. With their playful look and satisfying flavor, they’re sure to become a seasonal favorite. Here’s to a festive and delicious Halloween—may your kitchen be as lively as your haunted house.

  • Frozen Island Escape: The Unconventional Pia Colada Slushie

    Frozen Island Escape: The Unconventional Pia Colada Slushie

    Imagine capturing the tropics in a single sip without leaving your kitchen. This pia colada slushie isn just isn your typical frozen drink; it’s a nostalgic voyage back to childhood summers with a twist of adult indulgence. I discovered this recipe while experimenting with unexpected flavor combinations that evoke sunlit memories.

    The secret lies in the way frozen pineapple and coconut milk meld into a silky, frosty texture that feels like a vacation at first sip. Perfect for lazy weekends or unexpected guests, this slushie transforms simple ingredients into something refreshingly unique. It’s the kind of treat that makes you smile even before the first sip.

    WHY I LOVE THIS RECIPE?

    • It reminds me of carefree summer days by the beach, with the scent of salt and ripe pineapple in the air.
    • The texture is incredibly smooth, almost like biting into a frozen tropical sunset.
    • I love how flexible the recipe is—add a splash of rum or top with toasted coconut for extra flair.
    • This slushie is a cheerful chaos of flavors that dance on your tongue, yet feels perfectly balanced.
    • Making it is a joyful mess—blenders humming, ice cracking, and my kitchen smelling like a tropical paradise.

    AVOID MY DISASTER (You)
    • FORGOT to chill the coconut milk overnight. It froze into icy blocks. Freeze ahead!
    • DUMPED too much ice in the blender. Resulted in a watered-down mess. Adjust ice gradually.
    • OVER‑TORCHED the toasted coconut topping. Smashed it into burnt bits. Keep a close eye!
    • MISSED blending long enough. The pieces were chunky. Blend until silky smooth, about 30 seconds.

    QUICK FIXES THAT SAVE YOUR DAY

    • If the mixture is too thin, SPLASH in more frozen pineapple for thickness.
    • WHEN your blender stalls, SHIELD the base with a towel and blend in pulses.
    • DUMP extra coconut milk if your slushie feels too icy or runny.
    • Splash a bit of pineapple juice to enhance sweetness and aroma.
    • When in doubt, PANTRY swap: freeze store-bought pineapple chunks if fresh isn available.

    The playful, tropical burst of this pia colada slushie makes it a standout. It captures the essence of summer in every frosty sip, perfect for those days when you need a quick escape. As the seasons turn and gatherings unfold, this recipe offers a splash of sunshine and a dash of nostalgia.

    Whether you share it with friends or enjoy it alone on a quiet afternoon, it reminds us how simple ingredients can turn into something magical. Pour it into your favorite glass, garnish with a pineapple wedge, and let each sip transport you to island breezes and palm trees.

    Pina Colada Slushie

    This piña colada slushie combines frozen pineapple chunks and coconut milk blended into a creamy, frosty beverage that resembles a tropical sunset. The mixture has a smooth, icy texture with a vibrant, pale yellow appearance, perfect for sipping on a warm day or serving at gatherings.
    Prep Time 10 minutes
    Total Time 10 minutes
    Servings: 2
    Course: Main Course
    Cuisine: Tropical
    Calories: 180

    Ingredients
      

    • 2 cups frozen pineapple chunks preferably frozen ahead for best texture
    • 1 cup coconut milk chilled in the fridge overnight for optimal blending
    • 1 cup ice cubes to add frosty texture
    • 1 tablespoon simple syrup or honey optional, for added sweetness

    Equipment

    • Blender
    • Measuring cups

    Method
     

    1. Add the frozen pineapple chunks, chilled coconut milk, ice cubes, and sweetener (if using) to your blender.
    2. Secure the lid and blend on high for about 30 seconds, pulsing as needed, until the mixture becomes silky and frothy with a uniform pale yellow color.
    3. Stop the blender and check the texture; if it’s too thick, add a splash more coconut milk and blend again. If it’s too thin, add a handful of frozen pineapple chunks and blend briefly.
    4. Once the mixture is smooth, creamy, and well-blended, pour it into chilled glasses.
    5. Garnish with a pineapple wedge or a maraschino cherry for a festive touch, if desired.
    6. Enjoy your refreshing tropical piña colada slushie immediately for the best icy texture and flavor.

    Notes

    For an adult version, add a splash of rum before blending. For an extra tropical twist, sprinkle toasted coconut on top or rim the glass with shredded coconut. Remember to freeze the coconut milk overnight to prevent icy chunks and ensure smooth blending.
    Creating this pia colada slushie was a delightful reminder of how unexpected ingredients and a bit of fun can turn into a refreshing masterpiece. It perfect for hot days, lazy weekends, or whenever your spirit craves a vacation.

    I hope this recipe inspires you to experiment with your own tropical twists. Sometimes the best ideas come from playful chaos in the kitchen and a love for all things sunny and sweet. Cheers to cool escapes and sweet surprises in every glass.

  • Spooky Sweetness: Halloween Graveyard Pudding Cups

    Spooky Sweetness: Halloween Graveyard Pudding Cups

    Halloween is the perfect time to embrace a little chaos in the kitchen, especially when it comes to dessert. This year, I decided to ditch the usual candies and go for something that sparks imagination and nostalgia – Graveyard Pudding Cups. They’re as fun to look at as they are to eat, combining rich chocolate layers with creepy edible details.

    What I love about this spooky treat is how easily it transforms a simple pudding into a scene straight from a haunted graveyard. Plus, it’s a fantastic way to get kids involved, making the chaos of decorating part of the fun. The chocolate crumbs mimic dirt, and the gummy worms crawl out from the top—perfect for a thrilling Halloween party.

    These pudding cups aren’t just a dessert; they’re a small, edible spooky story in a cup. With a little creativity, you can customize the tombstones and ghosts to fit your spooky theme. It’s an easy, crowd-pleasing project that brings a little magic to your haunted night.

    Graveyard Pudding Cups

    This dessert features layers of rich chocolate pudding topped with crushed cookies resembling dirt, decorated with gummy worms and edible tombstones for a spooky Halloween presentation. The assembly involves layering, sprinkling, and decorating, resulting in a fun, creepy treat with contrasting creamy, crumbly, and chewy textures.
    Prep Time 20 minutes
    Cook Time 10 minutes
    Total Time 30 minutes
    Servings: 8
    Course: Main Course
    Cuisine: Halloween
    Calories: 250

    Ingredients
      

    • 1 package chocolate pudding mix instant, for layer filling
    • 2 cups cold milk for preparing pudding
    • 1 cup cookie crumbs chocolate cookies crushed to resemble dirt
    • 8 gummy worms gummy worms for decoration, crawling out from the dirt
    • 4 edible tombstones edible tombstone decorations small cookies or candy-shaped tombstones

    Equipment

    • Mixing bowls
    • Whisk
    • Serving cups or small jars
    • Spoon or spatula
    • Plastic bag or food processor (for crushing cookies)

    Method
     

    1. Prepare the chocolate pudding by whisking the pudding mix into the cold milk until smooth and slightly thickened, about 2-3 minutes.
    2. Divide the pudding evenly among the serving cups or jars, filling each about halfway to create the base layer.
    3. Sprinkle a generous layer of cookie crumbs over the pudding to mimic a dirt or soil surface. Gently press them down so they stay in place.
    4. Place gummy worms on top of the cookie crumbs, arranging them so they appear to crawl out of the dirt.
    5. Insert the edible tombstone decorations into the pudding, standing upright or leaning to give a haunted graveyard effect.
    6. Repeat the layering process with remaining cups: add pudding, sprinkle cookie crumbs, decorate with gummy worms and tombstones.

    Notes

    Feel free to customize the decorations with other edible spooky items like candy bats or ghost marshmallows for added fun.
    As the last crumb of dirt settles and your spooky scene comes together, you realize how delightfully simple and satisfying these graveyard cups are to make. They turn an ordinary dessert into a mini adventure, perfect for Halloween festivities.

    Enjoy watching your guests’ faces light up with their first glimpse of your creepy creation. Whether it’s the gummy worms wriggling out or the crumb-coated tombstones, these pudding cups bring a fun, festive spirit to the evening. Sometimes, it’s the small, spooky details that make the holiday memorable.