Blog

  • Spooky Soy Sauce Bat Wings: A Halloween Twist

    Spooky Soy Sauce Bat Wings: A Halloween Twist

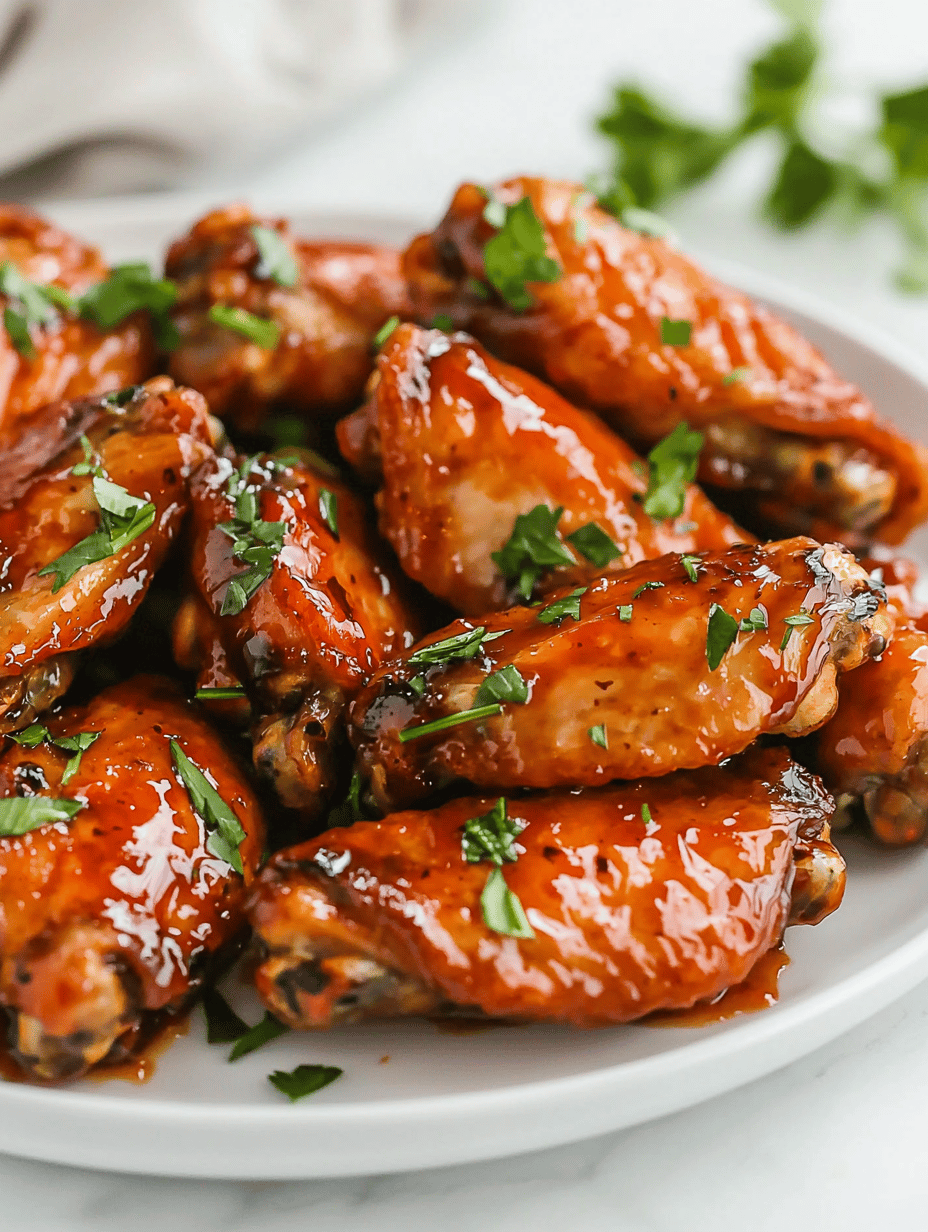
    Halloween is the perfect time to embrace the eerie and the delicious. This year, I wanted to create a treat that combines the spooky vibe with bold flavors—enter the Halloween Bat Wings. The dark, glossy soy glaze makes these chicken wings look like tiny, sinister bats swooping in from the night sky.

    What excites me most is the playful challenge of transforming simple chicken wings into something both haunting and crave-worthy. The savory soy sauce mingles with garlic, honey, and a whisper of sesame for a richly layered coating that’s finger-licking good. Plus, they’re quick to toss together, making them ideal for last-minute Halloween parties or a midnight snack.

    Halloween Bat Wings

    These chicken wings are coated in a savory soy glaze flavored with garlic, honey, and sesame, then baked until crispy with a glossy, dark finish that resembles tiny bats. The dish features a sticky, flavorful exterior with tender meat inside, perfect for festive Halloween gatherings or tasty snacks.
    Prep Time 10 minutes
    Cook Time 30 minutes
    Total Time 40 minutes
    Servings: 4
    Course: Main Course
    Cuisine: American
    Calories: 400

    Ingredients
      

    • 2 pounds chicken wings party-sized or drumettes and flats
    • 1/4 cup soy sauce for the glaze
    • 2 cloves garlic minced
    • 2 tablespoons honey for sweetness and gloss
    • 1 teaspoon sesame oil adds toasted flavor
    • 1 tablespoon sesame seeds for garnish and flavor

    Equipment

    • Baking sheet
    • Oven
    • Mixing bowl
    • Whisk
    • Cooking brush

    Method
     

    1. Preheat your oven to 400°F (200°C) and line a baking sheet with parchment paper for easy cleanup.
    2. Pat the chicken wings dry with paper towels; this helps achieve crispiness when baking.
    3. Arrange the wings on the prepared baking sheet in a single layer, ensuring they aren’t crowded to promote even cooking.
    4. Bake the wings in the oven for about 25-30 minutes, flipping once halfway through, until they’re golden brown and crispy with some bubbling on the edges.
    5. While the wings are baking, prepare the glaze by whisking together soy sauce, minced garlic, honey, and sesame oil in a bowl until well combined and slightly thickened.
    6. Remove the baked wings from the oven and brush them generously with the soy glaze using a cooking brush, covering all sides evenly.
    7. Return the glazed wings to the oven for an additional 5 minutes, allowing the glaze to set and become glossy.
    8. Once done, sprinkle the wings with sesame seeds for added flavor and visual contrast.
    9. Transfer the wings to a serving platter and let them cool slightly before serving to avoid burns and to let the glaze set firmly.
    10. Enjoy these shiny, dark-glazed chicken wings that resemble tiny bats, perfect for a spooky Halloween treat!
    These Bat Wings are more than just a visual treat; they bring comfort with each tender bite, layered with umami and a hint of sweetness. Their glossy black sheen makes every bite feel like a small piece of the night sky, perfect for embracing the festive spirit.

    As the crisp autumn air settles in, this dish offers a cozy, satisfying crunch paired with a deeply savory flavor. They’re ideal for sharing amidst pumpkin carvings and ghost stories, adding a deliciously spooky touch to your Halloween table. A simple yet striking dish, these wings will leave your guests craving more long after the night ends.

  • Frozen Citrus Vortex: A Gatorade Slushie Adventure

    Frozen Citrus Vortex: A Gatorade Slushie Adventure

    Imagine taking the bright, tangy essence of your favorite citrus fruits and transforming it into a frosty sip of nostalgia. Gatorade slushies aren’t just a cooling treat—they’re a vibrant playground of flavor that revives summer memories and energizes your day. This recipe is an homage to those carefree afternoons, with a twist of icy perfection.

    As a food blogger obsessed with eye-catching, flavor-packed drinks, I’ve found that the key to perfecting this slushie lies in balancing the tartness with just enough sweetness. The icy texture feels like a giant, refreshing gulp of cold citrus breeze. Once you master the chill, each sip delivers a burst of flavor that’s both familiar and exhilarating.

    Citrus Gatorade Slushies

    This recipe transforms citrus-flavored Gatorade into a frozen slushie by blending it with ice until smooth. The mixture has a vibrant, icy texture with a tangy, refreshing flavor, making it a cool summer treat with a bright appearance.
    Prep Time 10 minutes
    Total Time 10 minutes
    Servings: 2
    Course: Main Course
    Cuisine: shepherd’s style
    Calories: 120

    Ingredients
      

    • 2 cups Citrus Gatorade any flavor, chilled
    • 2 cups Ice cubes

    Equipment

    • Blender
    • Measuring cups and spoons
    • Serving glasses or cups

    Method
     

    1. Pour the chilled citrus Gatorade into the blender.
    2. Add the ice cubes to the blender with the Gatorade.
    3. Secure the lid on the blender and blend on high speed for about 30-45 seconds, until the mixture is thick and slushy with a frosty texture.
    4. Pause briefly and check the consistency; if needed, blend for a few more seconds to ensure the ice is evenly crushed and the texture is smooth.
    5. Pour the vibrant, icy slush into chilled glasses or cups.
    6. Serve immediately with a straw or spoon for a cool, tangy refreshment.
    Creating this Gatorade slushie was a delightful experiment in turning sports drink simplicity into a party for your taste buds. It’s perfect for hot days, game nights, or whenever you need a quick cool-down with a punch of flavor.

    This recipe proves that simple ingredients, when frozen into a slush, can revive your spirits and bring a bit of summer back into your glass. Keep your freezer stocked with colored drinks, and you’re always just minutes away from a refreshing escape. Cheers to icy adventures in your kitchen!

  • Spooky Simplicity: Crafting Your Perfect Halloween Mummy Pizza

    Spooky Simplicity: Crafting Your Perfect Halloween Mummy Pizza

    Halloween is my favorite time to get a little chaotic in the kitchen, especially with something as playful as a Mummy Pizza. The sight of gooey cheese tangled in shredded mozzarella and bits of olive eyes makes me nostalgic for childhood Halloweens filled with treats and costumes. This recipe turns simple pizza into a creepy masterpiece, perfect for a spooky snack or party platter.

    What I love most is how easy it is to customize—globs of melted cheese and crispy edges bring instant satisfaction. Plus, the aroma of garlic and baked crust fills the house with a festive spirit that screams Halloween fun. It’s a messy, joyful way to celebrate fall’s spooky charm with family and friends.

    Mummy Pizza

    Mummy Pizza transforms classic pizza into a playful, spooky snack with melted cheese, crispy crust, and olive eyes arranged to resemble a mummy. The dish is prepared by spreading sauce on dough, layering cheese, and decorating with olives before baking until bubbly and golden. Its final appearance is a fun, ghostly crust topped with tangled cheese and haunting eyes.
    Prep Time 15 minutes
    Cook Time 15 minutes
    Total Time 30 minutes
    Servings: 4
    Course: Main Course
    Cuisine: American
    Calories: 350

    Ingredients
      

    • 1 roll pizza dough store-bought or homemade
    • 1/2 cup pizza sauce your favorite marinara or tomato sauce
    • 1 cup shredded mozzarella cheese preferably shredded cheese blend
    • 6 pieces black olives pitted, sliced into small rounds for eyes
    • 1 clove garlic minced
    • 1 tablespoon olive oil for brushing the crust

    Equipment

    • Baking sheet
    • Rolling pin
    • Cooking parchment or silicone baking mat
    • Serrated knife

    Method
     

    1. Preheat your oven to 400°F (200°C) and line a baking sheet with parchment paper or a silicone mat. Roll out the pizza dough into a rectangular shape on a floured surface, then transfer it to the prepared baking sheet. This creates a flat, even base for your spooky masterpiece.
    2. Spread a layer of pizza sauce evenly over the dough, leaving about a half-inch border around the edges. This sauce forms the flavorful foundation for the cheese and toppings.
    3. Sprinkle a generous layer of shredded mozzarella cheese over the sauce, covering the entire surface with shredded tangles that will become the mummy’s wrappings.
    4. Brush the crust edges lightly with olive oil and minced garlic for added flavor and a golden-brown finish. This step also helps the edges crisp up nicely during baking.
    5. Bake in the preheated oven until the cheese is bubbling and slightly golden, about 12-15 minutes. The crust should be crisp around the edges and the cheese melted and bubbly.
    6. Remove the pizza from the oven and let it cool for a few minutes to set the cheese. Then, use a serrated knife to cut two small slits for eyes, or simply choose the best spots for placement.
    7. Place small slices of black olives into the eye slits to create creepy, black eyes. Scatter some additional olive slices across the surface for extra eye detail and facial features.
    8. Arrange the shredded cheese in a tangled, crisscross pattern across the crust, resembling mummy bandages. Let some cheese hang over the edges for a fun, messy look.
    9. Once decorated, return the pizza to the oven for an additional 2-3 minutes just to melt the cheese further if needed. Keep an eye on it to prevent burning.
    10. Remove the pizza from the oven, let it cool slightly, then slice and serve to enjoy a fun, spooky treat that’s perfect for Halloween parties.

    In just a few simple steps, you can transform ordinary pizza dough into a nightmarishly delightful treat. Every bite offers a crispy, cheesy thrill that’s satisfying yet perfect for sharing. It’s a small project that makes a big impact amid the Halloween chaos.

    So, gather your ingredients and let your creativity run wild. Whether you’re making these for a party or just a spooky snack on a chilly evening, they’re sure to bring a smile—if only from the giggles and glee it sparks. Enjoy the spooky season with this fun, easy recipe that everyone will remember.

  • The Secret Ingredient That Turns Tomato Sauce Into Magic

    The Secret Ingredient That Turns Tomato Sauce Into Magic

    Few smells are as comforting as simmering tomato sauce filling the kitchen with a sweet, tangy aroma. But this isn’t just any tomato sauce—it’s crafted with a surprising twist that transforms it from simple to unforgettable. I stumbled upon this method during a chaotic weekend, and it immediately changed my perspective on making sauce from scratch.

    What makes this recipe unique isn’t just the ingredients, but the process—slow, intentional, and filled with tiny moments of joy. It’s perfect for quiet weekends or when you want a splash of nostalgia with a splash of innovation. The best part? It’s incredibly forgiving, even if you’re short on time or patience.

    Slow-Simmered Tomato Sauce with a Twist

    This tomato sauce is crafted through a slow simmering process that brings out rich, layered flavors. Made with ripe tomatoes, aromatics, and a surprising addition, it develops a thick, velvety texture and deep umami flavor, perfect for spooning over pasta or elements of other dishes.
    Prep Time 15 minutes
    Cook Time 1 hour 30 minutes
    Total Time 1 hour 45 minutes
    Servings: 4
    Course: Main Course
    Cuisine: Mediterranean
    Calories: 150

    Ingredients
      

    • 2 lbs ripe tomatoes chopped
    • 1 medium onion finely chopped
    • 3 cloves garlic minced
    • 2 tablespoons olive oil extra virgin
    • 1/2 teaspoon red pepper flakes optional, for a touch of heat
    • 1 tablespoon balsamic vinegar adds a subtle sweetness and depth
    • to taste salt and freshly ground black pepper

    Equipment

    • Large heavy-bottomed pot
    • Wooden spoon or spatula

    Method
     

    1. Heat the olive oil in a large pot over medium heat until shimmering. Add the finely chopped onion and cook, stirring frequently, until it becomes translucent and fragrant—about 5 minutes.
    2. Add the minced garlic and red pepper flakes to the onions, stirring for about 30 seconds until the garlic is fragrant and just starting to turn golden.
    3. Pour in the chopped tomatoes, stirring to combine everything evenly. Bring the mixture to a gentle simmer, and then reduce the heat to low.
    4. Stir in the balsamic vinegar, which adds a subtle sweetness and depth to the sauce. Allow it to simmer gently, uncovered, for about 1 to 1.5 hours, stirring occasionally to prevent sticking and to help the flavors meld and thicken the sauce.
    5. If the sauce thickens too much before simmering time is complete, add a splash of water or broth to loosen it. Taste and season with salt and freshly ground black pepper as needed.
    6. Once the sauce has thickened beautifully, deepening in color and developing a rich aroma, remove it from heat.

    Notes

    For an extra depth of flavor, consider blending a portion of the sauce for a smoother consistency or leaving it chunky for texture.

    This tomato sauce is more than just a base for pasta—it’s a centerpiece that can elevate any meal. With its deep, layered flavors, it’s perfect for cozy dinners or feeding a crowd on a chilly evening. It reminds me that simple ingredients, when treated with love and patience, create magic on the plate.

    Hopefully, this recipe inspires you to experiment in your own kitchen. Sometimes, the best discoveries come from a bit of chaos and a lot of tasting. Now, every time I hear that bubbling sound on the stove, I smile, knowing I’m about to enjoy something truly special.

  • Chill Out: The Irresistible Chocolate Slushie That Elevates Your Summer

    Chill Out: The Irresistible Chocolate Slushie That Elevates Your Summer

    Imagine biting into a frozen cloud infused with rich, velvety chocolate. This isn’t just any cold treat—it’s a symphony of creamy sweetness that transforms an ordinary summer day into a mini celebration.

    What sets this chocolate slushie apart is its ability to mimic a decadent dessert while feeling refreshingly light. Making it at home means you can tweak every swirl and swirl of cocoa to match your mood and taste buds. Plus, it’s so quick to whip up, it’s practically begging to be part of your spontaneous summer plans.

    WHY I LOVE THIS RECIPE?

    • The nostalgic aroma of cocoa instantly takes me back to childhood summers.
    • The simplicity of just a few ingredients makes it a stress-free luxury.
    • Crafting it feels chaotically fun—like a mini science experiment in my kitchen.
    • Nothing beats the velvety texture melting in my mouth as the heat starts to creep in.
    • It’s an easy, satisfying way to cool down without sugary, artificial slushies.

    AVOID MY DISASTER (You’re Welcome)

    • FORGOT to chill the milk? It turns watery—add ice directly and blend longer.
    • DUMPED the cocoa powder into hot water? Use cold milk instead for smoothness.
    • OVER‑TORCHED the chocolate? Stir quickly with cream to recover silky richness.
    • FORGOT the sweetener? A splash of honey or agave keeps it luscious.

    QUICK FIXES THAT SAVE YOUR DAY

    • When the consistency is too runny, add more ice and blend until thickened.
    • Spray some cold water on the blender jar if it’s stuck—instant boost.
    • Shield your container with a towel if the blend gets too loud and hot.
    • When flavor’s flat, stir in a splash of vanilla extract for depth.
    • Splash chilled coffee into the mixture for an extra caffeine kick and shimmer.

    This chocolate slushie is more than just a cooling dessert. It’s a quick escape during hectic days or a soothing reward after a long hike. Its rich, bittersweet flavors carry you to a moment of joy, even when summer feels relentless.

    Seasons change, but one thing remains constant—nothing beats the simple pleasure of a homemade slushie. It’s a reminder that sometimes, the best treats are the easiest to make and hardest to forget.

    Chocolate Slushie

    This chocolate slushie is a frozen, creamy beverage made by blending cocoa, milk, and sweetener with ice until smooth and velvety. It has a thick, icy texture that resembles a decadent dessert, perfect for a refreshing treat on a hot day.
    Prep Time 5 minutes
    Total Time 5 minutes
    Servings: 2
    Course: Main Course
    Cuisine: American
    Calories: 150

    Ingredients
      

    • 1 cup milk chilled for best results
    • 2 tablespoons unsweetened cocoa powder sifted if lumpy
    • 2 tablespoons honey or agave syrup adjust sweetness as desired
    • 1 cup ice cubes amount may vary for desired thickness
    • 1/2 teaspoon vanilla extract optional, for added depth

    Equipment

    • Blender
    • Measuring cups and spoons

    Method
     

    1. Measure out the milk and pour it into the blender.
    2. Add the sifted cocoa powder and honey to the blender with the milk.
    3. Secure the lid and blend on high until the mixture is smooth and the cocoa is fully incorporated, about 30 seconds.
    4. Add the ice cubes and vanilla extract to the blender.
    5. Blend again on high for about 1 minute until the mixture is thick, icy, and creamy, with a velvety texture.
    6. Pause the blender, check the consistency, and add more ice if desired for a thicker slushie. Blend briefly to incorporate.
    7. Pour the slushie immediately into glasses and serve with a straw or spoon.

    Notes

    For an extra caffeine boost, stir in a splash of chilled coffee before blending. Adjust the sweetness with more honey if desired. Serve immediately for the best icy texture.

    Next time you crave something cold and chocolatey, remember how easy—and rewarding—it is to make your own. The playful swirl of cocoa, the crunch of fluffy ice, and the chilled silkiness all come together in a handful of minutes. It’s a little escape that fits perfectly into any busy day.

    Plus, making this at home means you control every ingredient—no artificial flavors or preservatives sneaking in. It’s a small act of self-care that cools your mind and energizes your spirit. Celebrate the fleeting joys of summer with this irresistible chocolate slushie—your taste buds will thank you.

  • Spooky Elegance: The Halloween Spider Cheese Ball

    Spooky Elegance: The Halloween Spider Cheese Ball

    As October’s chill settles in, I love how Halloween invites us to blend chaos with creativity. This year, I’m obsessed with a devilishly charming twist on cheese balls—a spooky spider that’s as eerie as it is irresistible. It’s not just a dip; it’s a conversation starter, perfect for parties where the vibe is all about fun and fright.

    The idea of turning a simple cheese ball into a creeping arachnid feels like unleashing a tiny Halloween masterpiece on your table. The crunchy legs, the gooey body—each piece plays a part in summoning that perfect spooky allure. Plus, it’s surprisingly easy to assemble, yet looks like you hired a professional horror chef.

    Spooky Spider Cheese Ball

    This recipe transforms a classic cheese ball into a Halloween-themed spider by shaping and decorating it with crunchy legs and a gooey body. The dish involves mixing cream cheese and cheese, shaping, and adding textures to resemble a creepy arachnid, resulting in a fun, visually striking appetizer with contrasting textures of creamy, crunchy, and soft elements.
    Prep Time 20 minutes
    Total Time 20 minutes
    Servings: 8
    Course: Main Course
    Cuisine: Halloween
    Calories: 150

    Ingredients
      

    • 8 oz cream cheese softened at room temperature
    • 1 ½ cups shredded cheddar cheese optional, for flavor
    • 1 tsp garlic powder
    • ½ tsp onion powder
    • ¼ tsp black pepper
    • ½ cup crushed pretzels or breadsticks for spider legs
    • optional plastic spiders or edible decorations for added spookiness

    Equipment

    • Mixing bowl
    • Rubber spatula
    • Plastic Wrap
    • Serving platter

    Method
     

    1. Begin by mixing the softened cream cheese, shredded cheddar, garlic powder, onion powder, and black pepper in a bowl until smooth and well combined.
    2. Gather the mixture and shape it into a rounded, oblong ball with your hands, smoothing the surface as much as possible.
    3. Wrap the cheese ball tightly with plastic wrap and chill in the refrigerator for at least 15 minutes to firm up.
    4. Remove the chilled cheese ball from the fridge and carefully transfer it onto a serving platter.
    5. Using crushed pretzels or breadsticks, insert them vertically into the sides of the cheese ball to resemble spider legs, spaced evenly around the body.
    6. If desired, place plastic spider decorations or edible decorations onto the cheese ball’s surface for extra creepy detail.
    7. Gently press the legs and decorations to ensure they stay secure, then serve immediately or refrigerate until ready to display and enjoy.

    Notes

    You can customize the spider’s size and decoration details to suit your Halloween decor. Using edible decorations can make it more appealing for kids, while plastic spiders add a spooky touch for adults.
    This Halloween, let your snacks do the talking. The spider cheese ball adds a touch of spooky whimsy and a burst of cheesy goodness that everyone will remember.

    Enjoy crafting this little monstrous centerpiece—remember, those creepy legs and gooey body are what make it fun. It’s a delightful way to bring everyone together, sharing laughs and maybe a little squeal or two amidst the creepy decor. Celebrate the season with a dish that’s as playful as it is tasty.

  • Hidden Veggie Wonder: The Stuffed Peppers That Surprise Your Taste Buds

    Hidden Veggie Wonder: The Stuffed Peppers That Surprise Your Taste Buds

    Few dishes combine comfort and nutrition as playfully as stuffed peppers do. This recipe takes a surprising turn by swapping traditional fillings for a colorful medley of leftover grains and seasonal vegetables. The peppers become a portable, edible canvas for flavor, making leftovers feel new and exciting.

    As the peppers roast, their sweet aroma mingles with garlic and herbs, transforming simple ingredients into something deeply satisfying. The perfect balance of textures—soft peppers with crunchy edges and tender filling—turns this dish into a visual feast and a sensory delight. It’s a clever way to reclaim ingredients that often get overlooked on busy nights.

    Stuffed Peppers with Leftover Grains and Vegetables

    This dish involves hollowing out colorful bell peppers and stuffing them with a mixture of cooked grains and seasonal vegetables. The peppers are then roasted until tender, with a slightly caramelized exterior and a savory, tender filling inside, creating a vibrant and appealing main course.
    Prep Time 15 minutes
    Cook Time 30 minutes
    Total Time 45 minutes
    Servings: 4
    Course: Main Course
    Cuisine: Various
    Calories: 250

    Ingredients
      

    • 4 large bell peppers preferably different colors for visual appeal
    • 1 cup cooked grains such as rice, quinoa, or leftover cooked grains
    • 1 cup seasonal vegetables chopped, e.g., zucchini, tomatoes, spinach
    • 2 cloves garlic minced
    • 2 tablespoons olive oil
    • to taste salt and pepper
    • 0.5 cup shredded cheese optional, for topping

    Equipment

    • Sharp knife
    • Baking dish
    • Mixing bowl
    • Spoon

    Method
     

    1. Preheat your oven to 400°F (200°C). Carefully cut the tops off the bell peppers and remove the seeds and membranes, creating a hollow cavity for the filling. Place the peppers upright in a baking dish.
    2. Heat olive oil in a skillet over medium heat. Add the minced garlic and sauté until fragrant, about 30 seconds, filling your kitchen with a warm aroma.
      4 large bell peppers
    3. Add the chopped seasonal vegetables to the skillet and cook until just tender, about 3-5 minutes. Stir occasionally to evenly cook and soften the vegetables, releasing their natural sweetness.
      4 large bell peppers
    4. Remove the skillet from heat and stir in the cooked grains. Mix well to combine everything into a cohesive filling. Season with salt and pepper to taste. Let it sit for a minute to allow flavors to meld.
      4 large bell peppers
    5. Spoon the filling evenly into each hollowed-out bell pepper, pressing gently to pack the mixture slightly but avoiding overflowing.
    6. Sprinkle shredded cheese evenly over the filled peppers, if using, for a golden, cheesy top after baking.
      4 large bell peppers
    7. Bake in the preheated oven until the peppers are tender and slightly browned around the edges, about 25-30 minutes. You’ll hear gentle bubbling and see the tops turn golden.
    8. Remove from the oven and let the peppers rest for a few minutes. Then, serve warm, garnished with fresh herbs if desired, revealing their vibrant colors and savory filling.
    These stuffed peppers are more than a meal; they’re a small celebration of ingenuity and sustainability. They remind us that with just a few ingredients, we can create something nourishing and delicious, even on the busiest evenings. Plus, they’re endlessly adaptable to whatever is lingering in your fridge.

    Whether you’re prepping for a cozy family dinner or impressing friends with a colorful dish, these peppers deliver comfort and joy in every bite. It’s a reminder that sometimes, the simplest recipes spark the biggest smiles.

  • Unexpected Fun: Blueberry Slushie with a Secret Twist

    Unexpected Fun: Blueberry Slushie with a Secret Twist

    Imagine turning a simple summer treat into a sensory adventure by adding a hint of surprise. That’s exactly what a blueberry slushie can do when you tweak its traditional recipe with an unexpected ingredient—fresh basil leaves. This unusual pairing awakens the fruity burst with a fragrant, herbaceous kick that surprises every sip.

    Now, I often find myself craving something icy and vibrant as the weather heats up, but standard recipes can feel a bit uninspired. Incorporating a fresh herb transforms it into a layered experience, one that hits different with its aromatic complexity. It’s a small twist that reshapes the classic into something memorable and refreshing.

    Blueberry Basil Slushie

    This blueberry basil slushie combines ripe blueberries blended with fresh basil leaves to create a vibrant, icy beverage. The mixture is pureed until smooth, resulting in a refreshing, slightly textured drink with a beautiful deep purple hue and a fragrant herbal note.
    Prep Time 10 minutes
    Total Time 10 minutes
    Servings: 2
    Course: Main Course
    Cuisine: Fusion
    Calories: 120

    Ingredients
      

    • 2 cups frozen blueberries pre-frozen for best texture
    • 8 leaves fresh basil tightly packed
    • 1 cup ice cubes
    • 1 tablespoon honey optional, for sweetness
    • 1 cup cold water

    Equipment

    • Blender
    • Measuring cups and spoons

    Method
     

    1. Place the frozen blueberries, fresh basil leaves, ice cubes, honey, and cold water into the blender jar.
    2. Secure the lid and blend on high speed until the mixture is smooth and bubbly, about 30-40 seconds, with a thick, icy texture.
    3. Pause to check the consistency; if it’s too thick, add a splash more water and blend again for a few seconds until pourable but still frosty.
    4. Pour the slushie into glasses, revealing a vibrant deep purple color with a slightly frosted surface.
    5. Garnish with a small basil leaf or a few blueberries for presentation.
    6. Serve immediately with a straw, enjoying the cool, fragrant burst of fruit and herb with each sip.

    Notes

    For a sweeter slushie, adjust honey to taste. You can also add a squeeze of lemon juice for a tangy contrast.

    This blueberry slushie isn’t just a cool beverage; it’s a reminder to experiment, even in the simplest recipes. With just a handful of blueberries and a splash of creativity, you elevate a familiar favorite into a delightful sensory journey.

    Enjoy it on a lazy afternoon or serve it up at a gathering where guests are eager for something both tasty and unexpected. Whatever the occasion, this drink promises a burst of flavor that lingers long after the last sip.

  • The Unexpected Charm of Roasted Butternut Squash & Carrot Soup

    The Unexpected Charm of Roasted Butternut Squash & Carrot Soup

    Imagine a bowl of soup that captures the golden hues of late autumn leaves, with a velvety texture that’s both comforting and sophisticated. This roasted butternut squash and carrot soup is not your average puree — it’s a slow embrace for chilly days, echoing cozy memories and quiet mornings.

    The magic begins with roasting, which transforms simple vegetables into caramelized treasures. As they cook, they release an irresistible aroma of toasted sweetness and earthiness, filling your kitchen with anticipation. It’s the kind of dish that feels both wholesome and indulgent, perfect for lingering over a warm spoonful.

    This recipe stands out because it celebrates the humble root vegetable in a way that feels luxurious yet easy enough for weeknights. With every sip, you get a taste of autumn’s warmth, but it’s also a reminder of how simple ingredients can turn into something special. A bowl of this soup might become your new seasonal ritual.

    Roasted Butternut Squash and Carrot Soup

    This roasted butternut squash and carrot soup features smooth, velvety pureed vegetables with a rich, caramelized flavor developed through roasting. The dish culminates in a warm, thick consistency with a vibrant orange hue, ideal for cozy, chilly days.
    Prep Time 15 minutes
    Cook Time 45 minutes
    Total Time 1 hour
    Servings: 4
    Course: Main Course
    Cuisine: Comfort Food
    Calories: 150

    Ingredients
      

    • 1 pound butternut squash, peeled and cubed about 1-inch pieces
    • 2 large carrots, peeled and chopped
    • 2 tablespoons olive oil for roasting
    • 1 small onion, chopped
    • 2 cloves garlic, minced
    • 4 cups vegetable broth
    • to taste salt and pepper

    Equipment

    • Baking sheet
    • Blender or immersion blender
    • Large pot

    Method
     

    1. Preheat your oven to 400°F (200°C). Spread the cubed butternut squash and chopped carrots evenly on a baking sheet. Drizzle with olive oil, then toss to coat. Roast for about 25-30 minutes until vegetables are tender and slightly caramelized.
    2. While the vegetables roast, sauté the chopped onion in a large pot with a splash of oil over medium heat until translucent and fragrant, about 5 minutes. Add minced garlic and cook for another minute, stirring constantly.
    3. Remove the roasted vegetables from the oven and add them to the pot with the onion and garlic. Pour in the vegetable broth and bring to a gentle simmer. Let it cook for 10 minutes to allow flavors to meld.
    4. Use an immersion blender or carefully transfer the mixture to a blender and blend until smooth and velvety. Be cautious of hot splashes if using a regular blender.
    5. Return the pureed soup to the pot if needed, and season with salt and pepper to taste. Warm gently over low heat, stirring occasionally, until heated through.
    6. Serve the soup hot in bowls, garnished with a drizzle of cream, a sprinkle of herbs, or a dash of extra black pepper if desired. Enjoy its rich, comforting texture and golden hue.

    Notes

    For a vegan option, skip any cream toppings. To add depth, include a pinch of smoked paprika or a splash of apple cider vinegar before serving.
    As you savor the last spoonful, you’ll appreciate how this soup turns everyday vegetables into a comforting masterpiece. The rich flavor lingers, inviting slow, thoughtful bites that warm both body and soul.

    In a world of busy days, taking the time to roast and blend vegetables like these helps slow down and reconnect with simple pleasures. Plus, the vibrant color alone brightens any gray day. This soup isn’t just nourishment — it’s a small celebration of the changing seasons.

  • Spooky Sweet: Halloween Pumpkin Cheesecake Bars with a Twist

    Spooky Sweet: Halloween Pumpkin Cheesecake Bars with a Twist

    Halloween baking isn’t just about spooky faces and bright orange candies. Sometimes, it’s about turning classic flavors into something delightfully unexpected. These Pumpkin Cheesecake Bars take a traditional fall treat and give it a daring twist with a hint of bourbon and a crumbly ginger snap crust.

    Imagine biting into a silky, spiced layer that whispers pumpkin pie, but with the rich undertone of cream cheese and a surprise crunch at the bottom. The aroma of cinnamon and vanilla rises as they bake, filling the kitchen with the perfect Halloween scent. It’s a playful yet elegant dessert that begs to be shared at your haunted gathering.

    Pumpkin Cheesecake Bars with Gingersnap Crust

    These Pumpkin Cheesecake Bars feature a creamy, spiced pumpkin filling combined with softened cream cheese, all atop a crunchy gingersnap crust. The dessert is baked until set with a golden top, offering a smooth, velvety texture contrasted by a crisp base and warm autumnal flavors.
    Prep Time 20 minutes
    Cook Time 40 minutes
    Total Time 1 hour
    Servings: 12
    Course: Main Course
    Cuisine: American
    Calories: 250

    Ingredients
      

    • 1 1/2 cups gingersnap cookies for crust
    • 1/4 cup unsalted butter melted
    • 16 oz cream cheese softened
    • 3/4 cup granulated sugar
    • 1 teaspoon vanilla extract
    • 1 1/2 cups canned pumpkin
    • 3 large eggs
    • 1 teaspoon ground cinnamon ground cinnamon
    • 1/2 teaspoon ground ginger ground ginger
    • 1/4 teaspoon ground cloves ground cloves
    • 1/4 teaspoon salt salt

    Equipment

    • 9×9-inch baking pan
    • Mixing bowls
    • Electric mixer or whisk
    • Measuring cups and spoons
    • Spatula
    • Oven

    Method
     

    1. Preheat your oven to 350°F (175°C). Crush the gingersnap cookies into fine crumbs using a food processor or by placing them in a zip-top bag and crushing with a rolling pin. Mix the crumbs with melted butter until evenly coated, then press this mixture firmly into the bottom of your baking pan to form the crust. Bake for 8-10 minutes until slightly set, then remove and let cool slightly.
    2. In a large mixing bowl, beat the softened cream cheese with an electric mixer until smooth and creamy, about 2-3 minutes. Gradually add the sugar and vanilla, continuing to mix until light and fluffy.
    3. Add the canned pumpkin to the cream cheese mixture and beat until fully incorporated and smooth. Then, one at a time, beat in the eggs, making sure each is fully blended before adding the next. This creates a rich, velvety pumpkin filling.
    4. Stir in the ground cinnamon, ginger, cloves, and salt to infuse warm spices into the filling. Mix until all ingredients are evenly distributed, and the batter is smooth.
    5. Pour the pumpkin filling over the pre-baked crust, spreading evenly to fill the pan. Smooth the top with a spatula for a flat surface.
    6. Bake the bars for 35-40 minutes, or until the filling is set around the edges and slightly jiggly in the center. The top should develop a light, golden hue. Once done, remove from oven and let cool completely in the pan to set up.
    7. Slice the cooled bars into squares and serve. The layers should be firm yet smooth, with a crisp crust and a silky, spiced pumpkin filling.

    Notes

    Store leftovers in the refrigerator for up to 3 days. For cleaner cuts, refrigerate the bars for at least 1 hour before slicing.

    These Pumpkin Cheesecake Bars are more than just festive—they’re a celebration of seasonal flavors that bring comfort with a cheeky edge. Making them is a great way to experiment with textures and find new favorites to enjoy every fall.

    Whether you’re hosting a spooky soirée or simply craving something sweet and spooky, this recipe adds a touch of daring to your seasonal spread. The combination of creamy pumpkin and spicy ginger snap is irresistible, especially with a drizzle of caramel or a dollop of whipped cream. It’s a small way to make your Halloween a little more memorable.