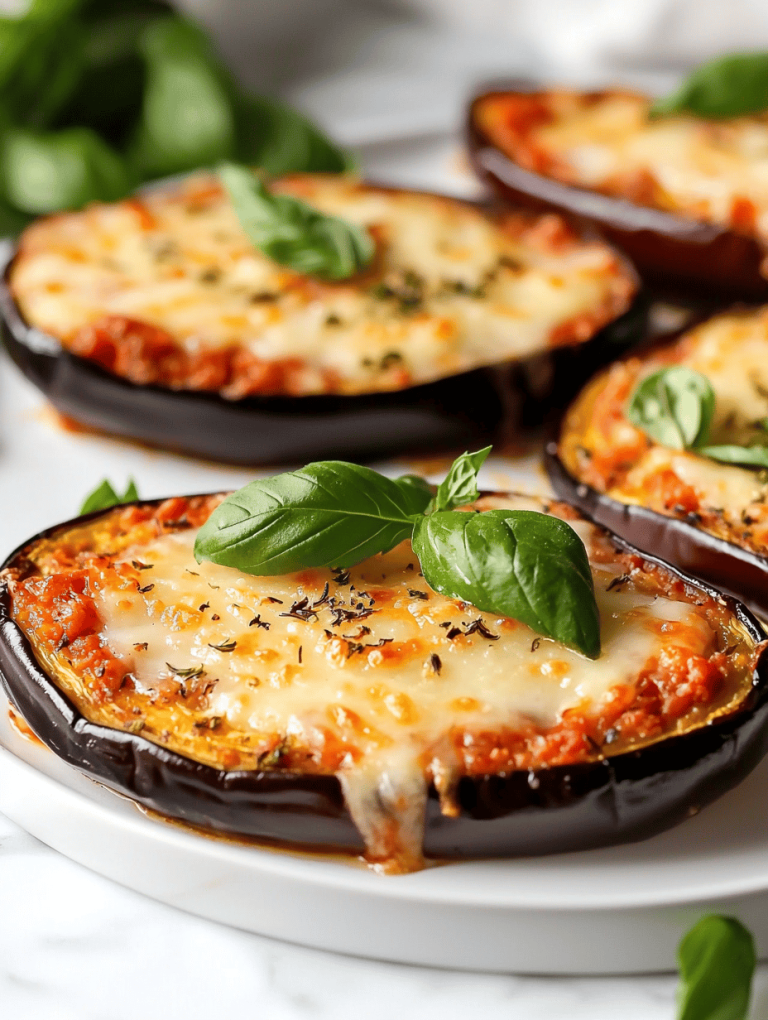
Category: Main Course

  • Decoding the Cozy Chaos: A Unique Take on Taco Soup

    Decoding the Cozy Chaos: A Unique Take on Taco Soup

    Imagine a bowl where the smoky aroma of cumin mingles with the vibrant crunch of fresh vegetables, all simmering in a pot that’s seen a day of culinary chaos. This Taco Soup isn’t just about satisfying hunger; it’s about embracing the messy joy of cooking with ingredients that tell a story. I love how this recipe invites improvisation—using what’s in your pantry and turning it into a comfort masterpiece.

    As someone who thrives in the delightful disorder of a bustling kitchen, I find this dish perfect for lazy weekends and spontaneous gatherings. Its layers of flavor—think tender meat, bold spices, and a sprinkle of cheese—bring back nostalgic dinners from my childhood but with a modern, hearty twist. Each spoonful feels like a small victory over the culinary clutter.

    Taco Soup

    Taco Soup is a hearty, flavorful stew made by simmering seasoned ground meat with a blend of beans, corn, diced tomatoes, and spices. The dish results in a thick, chunky soup with vibrant flavors and a comforting, slightly spicy aroma, topped with cheese and fresh herbs when serving.
    Prep Time 15 minutes
    Cook Time 30 minutes
    Total Time 45 minutes
    Servings: 6
    Course: Main Course
    Cuisine: American
    Calories: 350

    Ingredients
      

    • 1 pound ground beef or turkey, chicken, or plant-based ground meat
    • 1 medium onion diced
    • 3 cloves garlic minced
    • 1 cup corn kernels fresh, frozen, or canned
    • 2 cans diced tomatoes 14.5 oz each
    • 1 can black beans rinsed and drained
    • 1 cup beef or chicken broth or water with bouillon
    • 2 tablespoons taco seasoning store-bought or homemade blend
    • 1 cup shredded cheese cheddar or Mexican blend, for topping
    • to taste fresh cilantro chopped, for garnish

    Equipment

    • Large pot or Dutch oven
    • Wooden spoon

    Method
     

    1. Heat a large pot over medium heat. Add the ground beef and cook, breaking it apart with a wooden spoon, until browned and cooked through, about 5-7 minutes. Drain excess fat if necessary.
      1 pound ground beef
    2. Add the diced onion and minced garlic to the pot. Sauté for 3-4 minutes, stirring occasionally, until the onion becomes translucent and fragrant.
      1 medium onion, 3 cloves garlic
    3. Stir in the corn, diced tomatoes (including their juices), black beans, broth, and taco seasoning. Bring the mixture to a gentle simmer.
      1 cup corn kernels, 2 cans diced tomatoes, 1 can black beans, 1 cup beef or chicken broth, 2 tablespoons taco seasoning
    4. Reduce the heat to low and let the soup simmer uncovered for 20-25 minutes, stirring occasionally, until the flavors meld and the soup thickens slightly.
    5. Taste the soup and adjust seasoning if needed. Ladle the hot soup into bowls, sprinkle with shredded cheese and chopped cilantro for freshness.
      1 cup shredded cheese, to taste fresh cilantro
    6. Serve immediately, enjoying the hearty, flavorful stew with a tortilla chip or crusty bread if desired.

    Bringing together a cozy, satisfying meal like this Taco Soup feels like a small celebration of simple ingredients and bold flavors. It’s perfect for chilly nights when comfort food is needed, but with a twist of unexpected spice and texture. Plus, it’s flexible enough to let your creativity run wild—making every bowl uniquely yours.

    Cooking this soup is a reminder that sometimes, the best dishes come from embracing chaos and improvisation. It’s a meal that warms not just the body but also the spirit, especially when served with a side of good conversation. No matter how busily life spins, this recipe offers a little sanctuary in every bite.

  • Monster Burgers: Spooky & Delicious Halloween Treats

    Monster Burgers: Spooky & Delicious Halloween Treats

    Halloween is the perfect time to embrace the playful chaos of the season. Instead of classic costumes, why not serve up a dish that doubles as a conversation starter? These Monster Burgers turn ordinary grilled patties into fearsome, fun edible monsters.

    Imagine biting into a juicy burger with googly eyes and jagged cheese teeth, right before you scare your friends. It’s a creative way to make your Halloween feast unforgettable. Plus, they’re simpler than you think to assemble, even with all the spooky details.

    Monster Burgers

    Monster Burgers are playful, visually striking grilled beef patties assembled with cheese, lettuce, and fun edible decorations to resemble monster faces. The dish involves forming patties, grilling until juicy and charred, and adding toppings and face details for a whimsical final appearance. The result is a crispy-edged burger with gooey cheese and creative monster features that make them perfect for Halloween or themed parties.
    Prep Time 15 minutes
    Cook Time 10 minutes
    Total Time 25 minutes
    Servings: 4
    Course: Main Course
    Cuisine: American
    Calories: 550

    Ingredients
      

    • 1 1/2 pounds ground beef 80% lean for juiciness
    • 4 slices cheddar cheese cut into fun shapes or used as slices
    • 4 leaf lettuce for topping
    • 1 large tomato for face decorations
    • 1 small red onion for eyeballs and mouth
    • 4 small baby carrots for teeth or other monster features
    • to taste salt and pepper for seasoning

    Equipment

    • Grill or stovetop pan
    • Spatula
    • Knife
    • Cutting board

    Method
     

    1. Preheat your grill or stovetop pan over medium-high heat. Divide the ground beef into four equal portions and gently shape each into a round patty, pressing slightly in the center to prevent bulging as they cook.
    2. Season the patties generously with salt and pepper to taste, then place them on the hot grill or pan. Cook for about 4-5 minutes per side, until they’re nicely browned and juicy, with some grill or pan marks showing.
    3. While the burgers are cooking, prepare your toppings. Slice the tomato thinly for facial features, cut the red onion into small rounds or half-moons for eyes and mouths, and peel or cut baby carrots into small shapes for teeth or extra details.
    4. Once the patties are cooked through and have a little char, carefully transfer them to a plate. Place slices of cheese on each hot patty so they melt slightly from residual heat, creating gooey monster teeth or eyes.
    5. Start assembling your monster faces by placing a leaf of lettuce on the bottom bun or plate as a base for the burger. Top each burger patty with cheese and the prepared vegetables to create eyes, mouths, and other facial features. Use tiny pieces of red onion or baby carrots for details like teeth, fangs, or extra expressions.
    6. Finish each monster burger by adding any final touches—more eyes with small tomato slices or onion rings, jagged cheese or carrot teeth, and playful expressions. Cover with the top bun or serve open-faced for a more dramatic look.

    Notes

    Feel free to get creative with your monster facial features and use other vegetables or condiments for extra flair.

    Crafting these Monster Burgers is a delightful mix of chaos and creativity. They pack a punch of flavor and a burst of fun at your Halloween table. No matter your skill in the kitchen, these monsters will bring delight to kids and grown-ups alike.

    As the night wears on, the sight of these silly, scary burgers will keep everyone smiling. They’re perfect for a themed party or a casual spooky supper. Enjoy the magic of combining whimsy and flavor in your Halloween feast.

  • The Secret Ingredient That Transforms Your Classic Chili

    The Secret Ingredient That Transforms Your Classic Chili

    For years, I’ve been chasing a chili that balances smoky richness with a surprising depth of flavor from an unexpected source. Most recipes focus on spices and meat, but I’ve discovered that adding roasted poblano peppers elevates this dish to a whole new level. The smoky aroma of peppers charring on the grill as I prepare the base fills my kitchen with a nostalgic feel every time.

    This recipe is my tribute to those chaotic Sunday afternoons when I crave comfort with a twist. It’s perfect for chilly evenings or when I want to impress friends with a bowl that’s hearty yet intriguing. Each spoonful offers a complex harmony of warmth, spice, and that faint, sweet smokiness that ties it all together.

    Smoky Roasted Poblano Chili

    This chili features a rich, smoky flavor achieved by roasting poblano peppers and blending them into a hearty meat and bean base. The dish has a thick, chunky texture with vibrant, charred peppers providing visual and smoky accents throughout the stew.
    Prep Time 20 minutes
    Cook Time 40 minutes
    Total Time 1 hour
    Servings: 4
    Course: Main Course
    Cuisine: American
    Calories: 350

    Ingredients
      

    • 4 large poblano peppers whole
    • 1 lb ground beef or preferred ground meat
    • 1 onion yellow onion diced
    • 3 cloves garlic minced
    • 1 can (14 oz) diced tomatoes with juice
    • 1 can (15 oz) black beans drained and rinsed
    • 1 cup chicken or vegetable broth
    • 1 teaspoon ground cumin
    • 1/2 teaspoon smoked paprika
    • to taste salt and pepper

    Equipment

    • Grill or broiler
    • Large pot or Dutch oven
    • Tongs
    • Cutting board
    • Chef’s knife

    Method
     

    1. Preheat the grill or broiler to high. Place the poblano peppers directly over the heat source, turning occasionally until the skin is evenly charred and blistered, about 8-10 minutes. Use tongs to handle the peppers to prevent burns.
    2. Transfer the hot peppers to a bowl and cover with plastic wrap or a clean towel to trap steam. Let them sit for 10 minutes to loosen the skins.
    3. Once cooled enough to handle, peel away the charred skins from the peppers. Cut off the stems, halve the peppers lengthwise, and remove seeds. Chop the roasted peppers into bite-sized pieces.
    4. Heat a large pot or Dutch oven over medium heat. Add the ground beef and cook, breaking it apart with a spoon, until browned and cooked through, about 6-8 minutes. Drain excess fat if necessary.
    5. Add the diced onion to the meat and sauté until translucent and fragrant, about 4-5 minutes. Stir in the minced garlic and cook for another minute until fragrant.
    6. Pour in the diced tomatoes with their juice, stirring to combine. Let this simmer for 5 minutes so the flavors meld and the mixture thickens slightly.
    7. Stir in the chopped roasted poblano peppers, cumin, smoked paprika, salt, and pepper. Mix well to evenly distribute the smoky peppers and spices.
    8. Pour in the broth and add the rinsed black beans. Bring the mixture to a gentle boil, then reduce the heat to low and let it simmer uncovered for about 20-25 minutes, stirring occasionally, until the chili thickens to your desired consistency.
    9. Taste the chili and adjust seasoning with more salt, pepper, or spices if needed. The chili should be flavorful, smoky, and hearty with a slightly chunky texture.
    10. Serve hot, garnished with fresh toppings like sliced green onions, shredded cheese, or a dollop of sour cream if desired.

    Notes

    For extra smoky flavor, add a dash of chipotle powder or smoked cayenne. Roasting peppers individually over an open flame gives the best char, but broiling in the oven works well too. Adjust spice levels to taste.

    Making chili isn’t just about satisfying hunger — it’s about creating a little ritual that warms the soul. The use of roasted peppers gives this recipe a character that’s hard to beat, especially when paired with some crusty bread or crispy crackers. No matter how often I make it, each batch feels like a new adventure in flavor.

    As the seasons change, this chili reminds me of home, of shared tables and easy laughs. It’s a straightforward dish that proves sometimes, the best ideas come from a simple twist. Now, with this recipe in hand, I know I’ll never settle for ordinary chili again.

  • A Cozy Spin on Turkey Chili: Inspired by Vintage Casseroles

    A Cozy Spin on Turkey Chili: Inspired by Vintage Casseroles

    Imagine a chili that unites the smoky warmth of traditional recipes with the nostalgic charm of old-school casseroles. I recently stumbled upon an ancient family cookbook and decided to give their turkey chili a new life, adding hints of thyme and a splash of beer. The aroma that filled my kitchen was both familiar and intriguingly new, making me realize how versatile this dish truly is.

    This recipe isn’t just about comfort food; it’s a conversation starter, perfect for chilly evenings or a lazy weekend. The tender turkey breast, mixed with slow-simmered beans and spices, creates a symphony of textures and flavors. It’s a dish that feels like a warm memory, crafted with love and a dash of curiosity.

    Turkey Chili Casserole

    This turkey chili casserole combines ground turkey and beans simmered with spices, thyme, and a splash of beer, resulting in a hearty and flavorful dish. The mixture is baked until bubbling and tender, with a rich, thick texture and a golden-top crust. It serves as a comforting, rustic Main Course with a savory aroma and appealing appearance.
    Prep Time 15 minutes
    Cook Time 45 minutes
    Total Time 1 minute
    Servings: 6
    Course: Main Course
    Cuisine: American
    Calories: 350

    Ingredients
      

    • 1 pound ground turkey breast
    • 1 can canned kidney beans drained and rinsed
    • 1 can diced tomatoes with juices
    • 1 cup beer light or amber
    • 2 teaspoons dried thyme
    • 2 tablespoons olive oil
    • 1 medium onion finely chopped
    • 3 cloves garlic minced
    • 1 teaspoon chili powder
    • 1/2 teaspoon cumin
    • salt and pepper to taste
    • 1 cup shredded cheese cheddar or Monterey Jack

    Equipment

    • Large skillet
    • Baking dish
    • Stirring spoon
    • Measuring cups and spoons

    Method
     

    1. Heat olive oil in a large skillet over medium heat. Add the chopped onion and sauté until translucent and fragrant, about 3-4 minutes, stirring occasionally.
      1 medium onion
    2. Add minced garlic to the skillet and cook for another 30 seconds until it becomes aromatic.
      3 cloves garlic
    3. Increase heat to medium-high, then add the ground turkey. Cook, breaking it apart with a spoon, until browned and cooked through, about 6-8 minutes.
      1 pound ground turkey breast
    4. Stir in chili powder, cumin, salt, and pepper, allowing the spices to coat the meat evenly and become fragrant.
      1 teaspoon chili powder, 1/2 teaspoon cumin, salt and pepper to taste
    5. Pour in the beer and stir to deglaze the skillet, scraping up any browned bits from the bottom. Let it simmer for 2-3 minutes until slightly reduced.
      1 cup beer
    6. Add the diced tomatoes with their juices and drained beans to the skillet. Stir everything together and simmer on low heat for 10 minutes, allowing flavors to meld.
      1 can canned kidney beans, 1 can diced tomatoes
    7. Preheat your oven to 375°F (190°C). Transfer the chili mixture into a baking dish, spreading it evenly.
    8. Sprinkle the shredded cheese evenly over the top of the chili in the baking dish.
      1 cup shredded cheese
    9. Bake uncovered for about 20-25 minutes, or until bubbling around the edges and the cheese is golden and melted.
    10. Remove from oven and let sit for 5 minutes to settle before serving to avoid spillage and enhance flavor melding.
    11. Scoop portions onto plates, and enjoy this hearty, flavorful turkey chili casserole.
    This turkey chili gracefully balances hearty ingredients with a lightness that keeps it feeling fresh and inviting. As leftovers, it only deepens in flavor, making each subsequent bowl a small celebration of simplicity and warmth.

    Whether you’re dishing it out for a casual family dinner or a cozy night alone, this recipe offers a comforting escape in every bite. It’s a reminder that sometimes, the best meals are those rooted in tradition yet open to playful twists.

  • The Secret Ingredient in My Eggplant Parmesan: Toasted Bread Crumbs and a Whisper of Fennel

    The Secret Ingredient in My Eggplant Parmesan: Toasted Bread Crumbs and a Whisper of Fennel

    Cooking eggplant Parmesan often feels like a nostalgic ritual, but I like to shake things up by adding a secret twist that no one sees coming. Instead of the usual plain bread crumbs, I toast a mixture with fennel seeds, giving each bite a hint of licorice and warmth that elevates the dish beyond the familiar.

    This recipe has become my go-to when I crave comfort but want a little spark. The crisp topping, laced with that whisper of fennel, perfectly complements soft, slow-cooked eggplant and melting cheese. It’s a bold take that marries tradition with a dash of culinary adventure.

    Cooking this way reconnects me with memories of my grandma’s kitchen, where every dish had a story. Now, I’m sharing that story with my own family, with a flavor that is both nostalgic and refreshingly new.

    Fennel Seed Toasted Eggplant Parmesan

    This baked eggplant Parmesan features tender, slow-cooked eggplant slices topped with a crispy, toasted breadcrumb mixture infused with fennel seeds. The dish has a golden-brown crust and melty cheese layers, combining crunchy textures with soft, flavorful eggplant underneath.
    Prep Time 20 minutes
    Cook Time 35 minutes
    Total Time 55 minutes
    Servings: 4
    Course: Main Course
    Cuisine: Italian
    Calories: 380

    Ingredients
      

    • 2 large eggplants sliced into 1/4 inch rounds
    • 1 cup fennel seeds for toasted breadcrumb mixture
    • 1 cup plain breadcrumb crumbs for topping
    • 1 cup mozzarella cheese shredded
    • 1 cup Parmesan cheese grated
    • 2 cups tomato sauce for layering
    • 2 large eggs beaten
    • 1 cup all-purpose flour for dredging
    • to taste salt and pepper seasoning
    • 2 tablespoons olive oil for roasting

    Equipment

    • Baking dish
    • Cooking pan
    • Mixing bowls
    • Toothpick or fork
    • Oven

    Method
     

    1. Preheat the oven to 400°F (200°C) and lightly brush the eggplant slices with olive oil, then arrange them on a baking sheet. Roast for about 20 minutes until they are tender and lightly browned.
    2. While the eggplant roasts, toast the fennel seeds in a dry skillet over medium heat until fragrant, about 2 minutes. Crush them slightly and mix with breadcrumb crumbs, then set aside.
    3. Set up three shallow dishes for dredging: one with flour seasoned with salt and pepper, one with beaten eggs, and one with the toasted fennel-infused breadcrumb mixture.
    4. Dredge each roasted eggplant slice in the seasoned flour, then dip into the beaten eggs, allowing excess to drip off.
    5. Press the eggplant slices into the fennel breadcrumb mixture, ensuring an even coating on both sides. Place the coated slices on a baking dish.
    6. Bake the coated eggplant slices in the oven for another 10 minutes until crispy and golden.
    7. Spread a layer of tomato sauce in a baking dish, then arrange the crispy eggplant slices on top. Spoon additional tomato sauce over each piece.
    8. Sprinkle shredded mozzarella and grated Parmesan over the layered eggplant and sauce. Repeat layering if desired.
    9. Bake the assembled dish at 375°F (190°C) for 15-20 minutes until the cheese is bubbling and golden brown.
    10. Remove from the oven and let it rest for a few minutes. Serve hot, garnished with fresh herbs if desired.

    Notes

    For extra flavor, toast the fennel seeds longer until they slightly pop. Feel free to add crushed red pepper flakes for a spicy kick.
    Eggplant Parmesan, with its layers of melty cheese and savory tomato sauce, continues to be a favorite in my household. This version, with its toasted fennel crumbs, adds a little flair that makes it special for any occasion.

    As the season shifts and comforting meals become more essential, this dish offers a cozy, flavorful escape. It’s a reminder that a little twist can turn a classic into something truly memorable, filling the house with tempting smells and warm smiles.

  • Lazy Sunday Feast: The Irresistible Lasagna Soup Remix

    Lazy Sunday Feast: The Irresistible Lasagna Soup Remix

    Imagine comforting flavors packed into a single bowl, but with a twist that transforms your usual lasagna into a hearty soup. This recipe emerged during a lazy Sunday when I craved Italian warmth but lacked the energy for layered baking. As the aroma of bubbling cheese and seasoned broth filled my kitchen, I knew I had stumbled on something special.

    The beauty of this dish is how it balances richness and simplicity. It’s perfect for those who love the essence of lasagna but prefer a quicker, more spontaneous meal. Plus, it makes excellent leftovers, which only seem to improve overnight, soaking up all that savory goodness.

    Lasagna Soup

    Lasagna Soup is a hearty, brothy dish that combines the flavors of traditional lasagna using ground meat, crushed tomatoes, and ricotta, topped with melted cheese. The ingredients are simmered together to create a rich, flavorful broth with tender pasta, resulting in a comforting, bowl-worthy meal with a slightly chunky and inviting final appearance.
    Prep Time 10 minutes
    Cook Time 30 minutes
    Total Time 40 minutes
    Servings: 4
    Course: Main Course
    Cuisine: Italian
    Calories: 350

    Ingredients
      

    • 1 lb ground beef or Italian sausage for the meaty base
    • 1 medium onion diced
    • 3 cloves garlic minced
    • 28 oz crushed tomatoes canned
    • 4 cups chicken or vegetable broth
    • 8 oz small pasta (e.g., ditalini or broken lasagna noodles)
    • ½ cup ricotta cheese for topping
    • 1 cup shredded mozzarella cheese for melting on top
    • 1 tbsp olive oil for sautéing
    • to taste Salt and pepper

    Equipment

    • Large pot
    • Wooden spoon

    Method
     

    1. Heat olive oil in a large pot over medium heat and add the diced onion. Sauté until translucent and fragrant, about 3–4 minutes.
    2. Add the ground beef or Italian sausage to the pot and cook, breaking it apart with a wooden spoon, until browned and cooked through, about 5–7 minutes. Season with salt and pepper.
    3. Stir in the minced garlic and cook for another minute until it becomes fragrant, filling the kitchen with aroma.
    4. Add the crushed tomatoes and broth to the pot, stirring to combine everything well. Bring the mixture to a gentle simmer.
    5. Pour in the small pasta, stirring to distribute evenly. Cover the pot and cook for about 10 minutes or until the pasta is tender and the soup has thickened slightly.
    6. Uncover the pot and stir in the ricotta cheese, creating a creamy swirl through the broth, and ensure the pasta is coated and heated through.
    7. Sprinkle the shredded mozzarella cheese over the top and allow it to melt, about 2–3 minutes, until bubbly and golden.
    8. Give the soup one final stir, then taste and adjust seasoning with more salt or pepper as desired.
    9. Ladle the hot lasagna soup into bowls, ensuring each serving has plenty of pasta, meat, and melted cheese, ready to enjoy.

    Notes

    For extra flavor, add a pinch of red pepper flakes or fresh basil before serving. Leftovers can be stored in the refrigerator and reheat well the next day.
    This lasagna soup isn’t just a meal; it’s an experience of comfort and creativity in a bowl. It pairs beautifully with a crisp green salad or some warm crusty bread on the side. As the seasons shift, there’s something about a warm, cheesy soup that makes the day feel a little more settled.

    Whether you’re serving this up for a cozy family dinner or a casual gathering, it’s bound to satisfy. The magic lies in its ease and bold flavor, turning humble ingredients into a little feast. Here’s to many more lazy Sundays filled with this soul-warming recipe.

  • Spooky Sweetness: Halloween Jack-o’-Lantern Stuffed Peppers Explored

    Spooky Sweetness: Halloween Jack-o’-Lantern Stuffed Peppers Explored

    As the leaves turn and Halloween approaches, I find myself craving a dish that combines whimsy with comfort. These Jack-o’-Lantern stuffed peppers turn ordinary vegetables into playful, edible art. Their cheerful faces hide a savory surprise that’s perfect for a festive table or a fun family dinner.

    What makes this recipe special isn’t just the visual punch, but the way it transforms simple ingredients into something memorable. Baking these peppers brings out a sweet roasted aroma that mingles with the tangy cheese and herbs inside. Every bite is a mingle of textures and flavors, perfectly capturing autumn’s cozy spirit.

    Jack-o’-Lantern Stuffed Peppers

    This dish features bell peppers carved into jack-o’-lantern faces and filled with a savory mixture of rice, vegetables, and cheese. The peppers are baked until tender and the filling is bubbling, with the carved faces adding a playful and festive presentation. The final result is a colorful, whimsical main course with a tender texture and cheesy interior.
    Prep Time 30 minutes
    Cook Time 40 minutes
    Total Time 1 hour 10 minutes
    Servings: 4
    Course: Main Course
    Cuisine: American
    Calories: 250

    Ingredients
      

    • 4 large bell peppers preferably orange or yellow for vibrant color
    • 1 cup cooked rice white or brown rice, cooled
    • 1 cup diced vegetables such as zucchini, corn, or onion
    • 1/2 cup shredded cheese cheddar, Monterey Jack, or mozzarella
    • 2 cloves garlic minced
    • 2 tablespoons olive oil
    • to taste salt and pepper
    • 1 tablespoon balsamic vinegar optional for added flavor

    Equipment

    • Chef’s knife
    • Baking sheet
    • Spoon
    • Paring Knife
    • Mixing bowl

    Method
     

    1. Preheat your oven to 375°F (190°C). Wash and dry the bell peppers, then carefully cut off the tops and carve jack-o’-lantern faces into each using a paring knife. Set aside the tops for later use.
    2. Scoop out the seeds and membranes from inside each carved pepper to create a hollow cavity suitable for stuffing. Place the peppers upright on a baking sheet lined with parchment paper.
    3. In a mixing bowl, combine the cooked rice, diced vegetables, shredded cheese, and minced garlic. Season with salt, pepper, and a splash of balsamic vinegar if using. Mix well to create a flavorful filling.
    4. Use a spoon to fill each carved pepper with the rice mixture, packing it gently but firmly. Place the carved tops back onto each pepper to resemble the “hat” of the jack-o’-lantern.
    5. Bake the stuffed peppers in the preheated oven for about 35-40 minutes, until the peppers are tender and the filling is bubbling around the edges. The carved faces will become slightly roasted and charmingly carved.
    6. Remove from oven and let cool slightly. Carefully transfer the peppers to a serving platter, then enjoy their colorful appearance and savory aroma. Serve warm for a fun and festive main dish.

    This recipe is as much about the experience as the taste. Watching the kids giggle at their grinning peppers makes the effort worthwhile. Plus, it’s flexible enough to customize with your favorite fillings or spices, making it a versatile addition to your Halloween menu.

    As more are embracing playful, eye-catching food for the season, these stuffed peppers stand out. They are a cheerful reminder that holiday cooking can be fun as well as delicious. No matter your skill level, they bring a dash of joy and a splash of autumn to your table.

  • Warm & Cozy White Chicken Chili: A Unique Twist on Comfort Food

    Warm & Cozy White Chicken Chili: A Unique Twist on Comfort Food

    Ever thought about transforming the classic chicken chili into something lighter and creamier without losing its hearty charm? This white chicken chili recipe does just that, with a gentle, whispering aroma of cumin and the warmth of tender chicken melting in your mouth. It’s a little different from the usual red chili, offering a subtle elegance that’s perfect for cozy nights or lazy weekends.

    What makes this dish stand out is its creamy base, thanks to a blend of cannellini beans and a splash of lime that brightens every spoonful. I love how the ingredients come together in one pot, creating a symphony of flavors that are both soothing and refreshingly vibrant. It’s an unexpected treasure in the world of chili, inviting you to explore new comfort zones.

    WHY I LOVE THIS RECIPE?

    • The creamy texture reminds me of my childhood Sunday dinners but with a modern twist.
    • The subtle spice level makes it flexible for everyone, from kids to spice lovers.
    • It fills the house with the inviting scent of roasted garlic and warm spices.
    • Vegetable or grain additions are easy to toss in, customizing each batch.

    AVOID MY DISASTER (You’re Welcome)

    • FORGOT to taste and adjust the seasoning—ended up with bland, sad soup. Fix: Add more salt and lime!
    • DUMPED too much broth—made it watery. Fix: Stir in extra beans or rice for thickness.
    • OVER‑TORCHED the garlic—smelled burnt and bitter. Fix: Drop it, and use fresh garlic next time.
    • FREAKED when I saw no thickening—forgot to add the cream. Fix: Mix in some sour cream or Greek yogurt.

    QUICK FIXES THAT SAVE YOUR DAY

    • When soup is too thin, splash in some cornstarch slurry. Watch it shimmer and thicken!
    • Patch blandness with a dash more cumin or a squeeze of lime. Aroma instantly lifts!
    • Shield over‑cooked chicken by shredding and stirring back in—restores moisture and flavor.
    • When you forget to add beans, just mix in a can from the pantry. Crinkle of the can opening is the best sound!
    • If you’re out of sour cream, blend cream cheese into the hot soup—silky smooth and satisfying.

    This white chicken chili stands out as a go-to recipe when craving something hearty yet fresh. Its smooth, inviting texture and gentle spice make it an all-season favorite. Whether you’re after comfort on a cold day or a vibrant crowd-pleaser, it hits the right notes effortlessly.

    Plus, it’s flexible enough to pair with everything from cornbread to crispy greens. Every spoonful offers a reminder that good food doesn’t need to be complicated to be deeply satisfying. Sometimes, the simplest ingredients come together to create a truly memorable meal.

    White Chicken Chili

    This white chicken chili is a hearty stew made with tender shredded chicken, cannellini beans, and a creamy broth flavored with cumin and garlic. The dish has a smooth, velvety texture and an inviting aroma, with a bright splash of lime adding freshness. It is simmered until the ingredients meld into a flavorful, comforting soup.
    Prep Time 15 minutes
    Cook Time 30 minutes
    Total Time 45 minutes
    Servings: 6
    Course: Main Course
    Cuisine: American
    Calories: 320

    Ingredients
      

    • 2 pounds boneless, skinless chicken breasts or thighs, shredded after cooking
    • 2 tablespoons olive oil for browning the chicken
    • 1 cup diced onion yellow or white
    • 3 cloves garlic minced
    • 1 teaspoon ground cumin
    • 4 cups chicken broth
    • 2 cans cannellini beans drained and rinsed
    • 1 cup fresh or frozen corn kernels optional
    • 0.5 cups sour cream for creaminess, optional
    • 1 tablespoon lime juice brightens the flavor
    • to taste salt and pepper

    Equipment

    • Large pot
    • Wooden spoon

    Method
     

    1. Heat a large pot over medium heat and add the olive oil. Once shimmering, place the chicken breasts in the pot and cook until browned on both sides, about 5-6 minutes per side. Remove the chicken and set aside.
    2. Add diced onions to the same pot and sauté until transparent and fragrant, about 3-4 minutes. Stir in the minced garlic and cook for another minute until aromatic.
    3. Return the browned chicken to the pot, along with the ground cumin. Pour in the chicken broth, ensuring the chicken is mostly covered. Bring to a gentle simmer and cook until the chicken is cooked through, about 15 minutes.
    4. Carefully remove the chicken, shred it with two forks, and return it to the pot. Stir in drained cannellini beans and corn kernels if using. Continue to simmer for another 5 minutes to meld the flavors.
    5. Stir in sour cream for creaminess and add lime juice. Taste and season with salt and pepper as needed. Let the soup simmer for an additional 2 minutes to incorporate all flavors.
    6. Serve the white chicken chili hot, garnished with fresh herbs or a squeeze of lime if desired. Enjoy the smooth, hearty texture and warm aroma of this comforting dish!

    Notes

    Adjust seasoning with more lime or cumin to suit your taste. For a thicker chili, mash some beans before adding them back in. Leftovers taste even better the next day as flavors deepen.

    As the pot cools, I find myself already looking forward to the next batch. The subtle flavors and comforting texture keep pulling me back, even on busy weeknights. It’s a recipe that feels both familiar and refreshingly new each time I make it.

    In a world of constantly changing food trends, this white chicken chili remains a constant source of warmth and solace. It’s more than just a meal—it’s a small celebration of simplicity and flavor. Sometimes, that’s all you really need.