Baked potato chips are one of those sneaky snacks that feel a little bit virtuous, even when you can’t resist reaching for more. I love how simple it is to turn everyday potatoes into something crispy and satisfying without deep frying. It’s like a small act of kitchen rebellion—crisp, salty, and totally doable at home with just a few ingredients.
What really keeps me coming back to this recipe is how forgiving it is. Thin slices, a quick bake, and you get chips that crackle with that perfect balance of crunch and flavor. Plus, there’s something oddly satisfying about making my own snack from scratch—knowing exactly what’s in it, avoiding artificial stuff, and still ending up with something totally addictive.
Focusing on how to turn humble baked potato slices into crispy, snackable chips that rival fried versions, but with a healthier twist and home-kitchen simplicity.
The story behind this recipe
- This recipe was born out of a lazy Sunday afternoon when I found a bag of potatoes lurking in the pantry and a craving for something crispy. I didn’t want to deep fry or reach for the store-bought bag filled with preservatives. Instead, I experimented with thin slices, a hot oven, and a sprinkle of sea salt, and the result was surprisingly satisfying—crisp and light, with that satisfying potato flavor.
- I remember the first time I made these, I was surprised how easily they came together. No fuss, just patience with the slicing and a watchful eye in the oven. They became a regular snack for me and my family, especially when we’re craving something crunchy without the guilt or mess of frying. There’s a quiet pleasure in knowing I made something so simple and delicious from scratch.
- heading: ‘The story behind this recipe’
Ingredient breakdown: key components
- Potatoes: I prefer russets for their starchy, fluffy interior that crisps up beautifully—try a Yukon Gold for a slightly waxier bite that’s still crispy on the edges.
- Olive oil: A light brush of good-quality olive oil helps the slices crisp evenly and adds a subtle fruity aroma—skip it for a drier chip, but expect less shine and slightly softer texture.
- Salt: My go-to is flaky sea salt, which melts just enough during baking to give a burst of salty crunch—use finely ground salt if you want a more uniform coating.
- Paprika or smoked paprika: Adds a smoky, sweet note that elevates plain chips—use it sparingly, or leave it out for a pure potato flavor.
- Black pepper: Freshly cracked pepper gives a warm, pungent heat—don’t skip it if you like a little spice, but a pinch is enough to avoid overpowering the potato’s natural taste.
- Optional herbs (like rosemary or thyme): I love sprinkling dried herbs for an aromatic boost—use dried for even distribution, or fresh if you want bursts of herbal freshness.
- Vinegar spray (optional): A quick spritz of apple cider vinegar before baking can add a tangy brightness—use sparingly to avoid sogginess, but it makes a noticeable flavor difference.
Spotlight on key ingredients
Potatoes:
- I prefer russets for their starchy, fluffy interior that crisps up beautifully—try a Yukon Gold for a slightly waxier bite that’s still crispy on the edges.
- Olive oil: A light brush of good-quality olive oil helps the slices crisp evenly and adds a subtle fruity aroma—skip it for a drier chip, but expect less shine and slightly softer texture.
- Salt: My go-to is flaky sea salt, which melts just enough during baking to give a burst of salty crunch—use finely ground salt if you want a more uniform coating.
Olive oil:
- A light brush of good-quality olive oil helps the slices crisp evenly and adds a subtle fruity aroma—skip it for a drier chip, but expect less shine and slightly softer texture.
- Salt: My go-to is flaky sea salt, which melts just enough during baking to give a burst of salty crunch—use finely ground salt if you want a more uniform coating.
Notes for ingredient swaps
- Dairy-Free: Skip butter or cheese; the chips stay pure potato. Use a light spray of oil instead for shine.
- Vegan: Use olive or avocado oil instead of butter; keeps the flavor clean and plant-based.
- Low-Sodium: Reduce salt or use a salt substitute; the chips will be less salty but still tasty.
- Herb Variations: Fresh herbs like parsley or dill can replace dried ones; add after baking for freshness.
- Spice Up: Cayenne or chili powder for a fiery kick; add sparingly to avoid overpowering the potato flavor.
- Sweet Version: Cinnamon and a touch of sugar; turn these into a sweet snack, baked until fragrant.
- Oil Choices: Coconut oil adds a subtle sweetness and rich aroma; keep an eye on the smoke point.
Equipment & Tools
- Mandoline or sharp knife: To slice potatoes uniformly thin for even crisping.
- Baking sheet: To hold the potato slices during baking.
- Parchment paper: To prevent sticking and make cleanup easier.
- Silicone spatula or tongs: To handle hot slices and remove them safely from the oven.
- Cooling rack: To allow air circulation and crisp the chips as they cool.
Step-by-step guide to baked potato chips
- Equipment & Tools: Gather a mandoline or sharp knife for thin slicing, a baking sheet, parchment paper, a silicone spatula or tongs, and a cooling rack.
- Preheat oven to 200°C (392°F). Line your baking sheet with parchment paper for easy cleanup.
- Wash and peel potatoes. Use the mandoline or a sharp knife to slice potatoes very thin (about 1-2 mm). Keep slices uniform for even crisping.
- Arrange slices in a single layer on the prepared baking sheet. Overlapping slightly is okay, but avoid stacking.
- Lightly brush or spray the potato slices with olive oil. Sprinkle with salt and any optional spices or herbs.
- Bake in the preheated oven for 15-20 minutes. Check around the 12-minute mark; they should start to turn golden around the edges.
- a. For even baking, rotate the baking sheet halfway through. b. Keep an eye on them to prevent burning. c. If some are browning faster, remove those and continue baking the rest.
- Once crispy and golden, remove from oven and transfer chips to a cooling rack. Let sit for 5 minutes to firm up.
- Finish with a light sprinkle of additional salt or spice if needed. Serve immediately or store once cooled.
Let the chips cool on the rack for at least 5 minutes to ensure they’re crispy. Serve immediately for best crunch, or store in an airtight container once fully cooled to maintain crispness.
How to Know It’s Done
- Chips are uniformly golden and crisp around the edges.
- They crackle softly when you bite into them, with no dampness or sogginess.
- The slices feel firm and snap easily when broken or bitten.
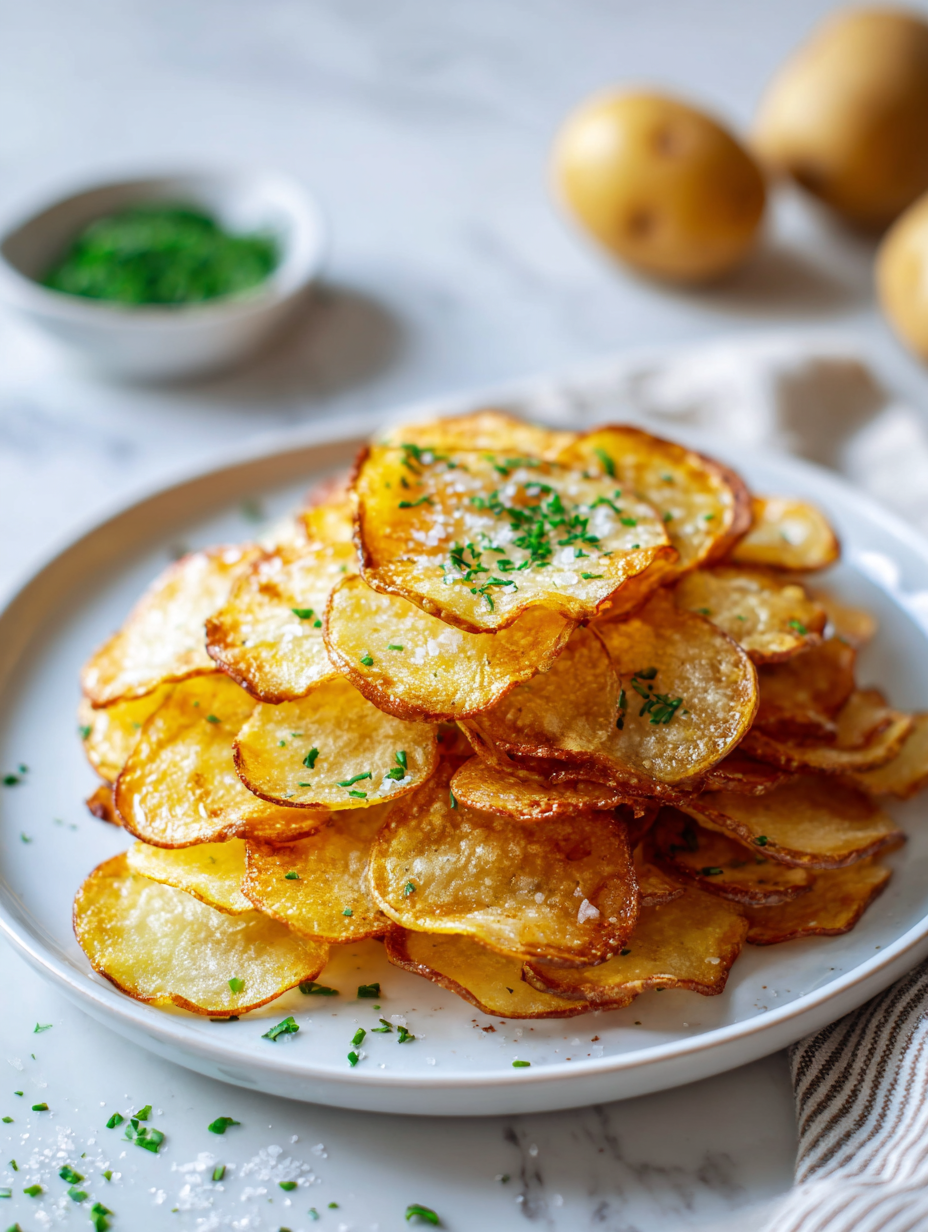
Baked Potato Chips
Ingredients
Equipment
Method
- Begin by washing and peeling your potatoes, then set them aside. Prepare your mandoline or sharp knife for slicing.
- Slice the potatoes very thin, about 1-2 mm thick, ensuring each slice is uniform for even baking. Arrange the slices in a single layer on a parchment-lined baking sheet.
- Lightly spray or brush the potato slices with olive oil, making sure each piece gets a thin, even coating. This helps them crisp up nicely in the oven.
- Sprinkle the slices evenly with sea salt, paprika, and freshly cracked black pepper if using. Feel free to adjust seasoning to your taste.
- Preheat your oven to 200°C (392°F). Place the baking sheet in the oven and bake for about 15-20 minutes, checking around the 12-minute mark.
- Watch for the edges of the slices to turn a golden brown and become crispy. Rotate the baking sheet halfway through baking for even crisping.
- Once the chips are golden and crisp around the edges, remove the baking sheet from the oven. Carefully transfer the chips onto a cooling rack using tongs or a spatula.
- Let the chips cool on the rack for about 5 minutes. This helps them firm up and enhances their crunchiness.
- Taste and add a pinch more salt or seasoning if desired. Serve immediately for best crunch or store in an airtight container once fully cooled.
Notes
Pro tips for perfect baked potato chips
- Thin Slices: Use a mandoline for uniform thickness, ensuring even crisping and a delicate crunch.
- Proper Spacing: Arrange slices in a single layer without overlapping to prevent sogginess and promote crispness.
- Light Oil Coating: Spray or brush lightly—too much leads to greasy chips, too little may cause sticking and uneven browning.
- Watch Baking Time: Keep an eye at 12-15 minutes; they go from perfect to burnt quickly, especially at higher temps.
- Cool Before Storing: Let chips sit on a rack for 5 minutes post-baking to firm up and avoid sogginess when stored.
- Season After Baking: Add extra salt or spices once out of the oven for maximum flavor without drawing moisture during baking.
- Use Parchment Paper: Prevent sticking and make cleanup easier, especially with oily or seasoned slices.
Common mistakes and how to fix them
- FORGOT to watch oven closely → Chips burn quickly, lower heat or extend baking time slightly.
- DUMPED too much oil → Use a light spray or brush to avoid soggy chips and uneven crispness.
- OVER-TORCHED edges → Remove chips immediately; they turn bitter and lose crunch.
- MISSED flipping or rotating → Ensure even browning by turning slices halfway through baking.
Quick fixes and pantry swaps
- When chips look pale, increase oven temperature slightly for quicker crisping.
- Splash a tiny bit of vinegar on slices before baking to enhance flavor and crispness.
- Patch soggy chips by returning them to a hot oven for 2-3 minutes until crispy.
- Shield burnt edges with a piece of foil and lower oven heat to rescue over-torched chips.
- DUMPED too much oil? Use a paper towel to blot excess and restore crunch quickly.
Prep, store, and reheat tips
- Slice potatoes ahead of time and store in a sealed container in the fridge for up to 24 hours. Keep them cold to prevent browning and maintain crispness.
- You can bake the chips a day in advance; once cooled completely, store in an airtight container for up to 2 days. They may lose some crispness but can be refreshed in a hot oven.
- Reheat chips in a 180°C (350°F) oven for 3-5 minutes until warmed and crispy again. Watch closely to avoid burning or sogginess.
- For best flavor and texture, serve chips immediately after reheating. If they sit too long, they may become limp or stale, losing their initial crunch.
Top questions about baked potato chips
1. How thin should I slice the potatoes?
Use a mandoline or a very sharp knife to get paper-thin slices, which are key for crispiness. Thicker slices tend to stay soft.
2. Can I stack the potato slices?
Arrange slices in a single layer on the baking sheet, leaving a little space. Overlapping slices won’t crisp evenly.
3. How long should I bake the chips?
Bake at 200°C (392°F) for 15-20 minutes. Start checking at 12 minutes; they should be golden around the edges and crispy.
4. Do I need to oil the slices?
Use a light spray or brush of oil—just enough to coat. Too much oil makes chips greasy, too little can lead to uneven crisping.
5. Should I wait before eating or storing?
Let the chips cool on a rack for at least 5 minutes. They firm up as they cool, ensuring maximum crunch.
6. How do I store baked chips?
Store cooled chips in an airtight container at room temperature for up to 2 days. They can be reheated in a hot oven for a few minutes.
7. What if my chips overcook or burn?
If chips burn quickly, lower the oven temperature slightly or check earlier. Remove burnt edges immediately to prevent bitterness.
8. When should I add spices and salt?
Add extra seasoning after baking for the best flavor. Salt and spices tend to draw out moisture if added before baking.
9. Can I use different types of potatoes?
Try Yukon Golds for a slightly waxier texture or sweet potatoes for a different flavor. Adjust cooking time accordingly.
10. Can I prep slices in advance?
Yes, you can prepare slices ahead, cover, and refrigerate for up to 24 hours. Just pat dry before baking to ensure crispness.
Making these baked potato chips is a little act of kitchen rebellion—turning humble slices into something crackly and satisfying without the mess of frying. There’s a quiet joy in controlling the ingredients and savoring that perfectly crisp crunch. Once you get the hang of it, you’ll find yourself reaching for these whenever you need a quick, honest snack.
In a world of overly processed snacks, these chips remind me how simple ingredients and a bit of patience can still deliver real pleasure. They’re perfect for lazy weekends or when a craving strikes, and I love how flexible they are for experimenting with flavors or thicknesses. Sometimes, the best snacks are the ones you make yourself, right in your own kitchen.

Welcome to Exploreing New Tastes. I’m really glad you found your way here. I’m a food blogger driven by curiosity more than perfection. I think about flavors constantly, how they change across cultures, how a small tweak can completely shift a dish, and how food tells stories long before anyone sits down to eat. This blog is where I document that curiosity, one recipe and one experience at a time.