Baking kale chips is my go-to method for keeping their vibrant green color and boosting that earthy, slightly bitter flavor into something more complex and appetizing. There’s something satisfying about watching the edges crisp up without turning to ash, preserving that fresh kale brightness. It’s a simple trick that transforms a humble green into a snack I actually crave.
I used to fry kale or dehydrate it, but baking feels like the best way to get crispy without losing the lively green and fresh taste. Plus, there’s a certain joy in the smell that wafts through the kitchen—like toasted greens and a hint of garlic or seasoning—making the whole process feel like a little celebration. It’s honest, unpretentious, and honestly, kind of addictive.
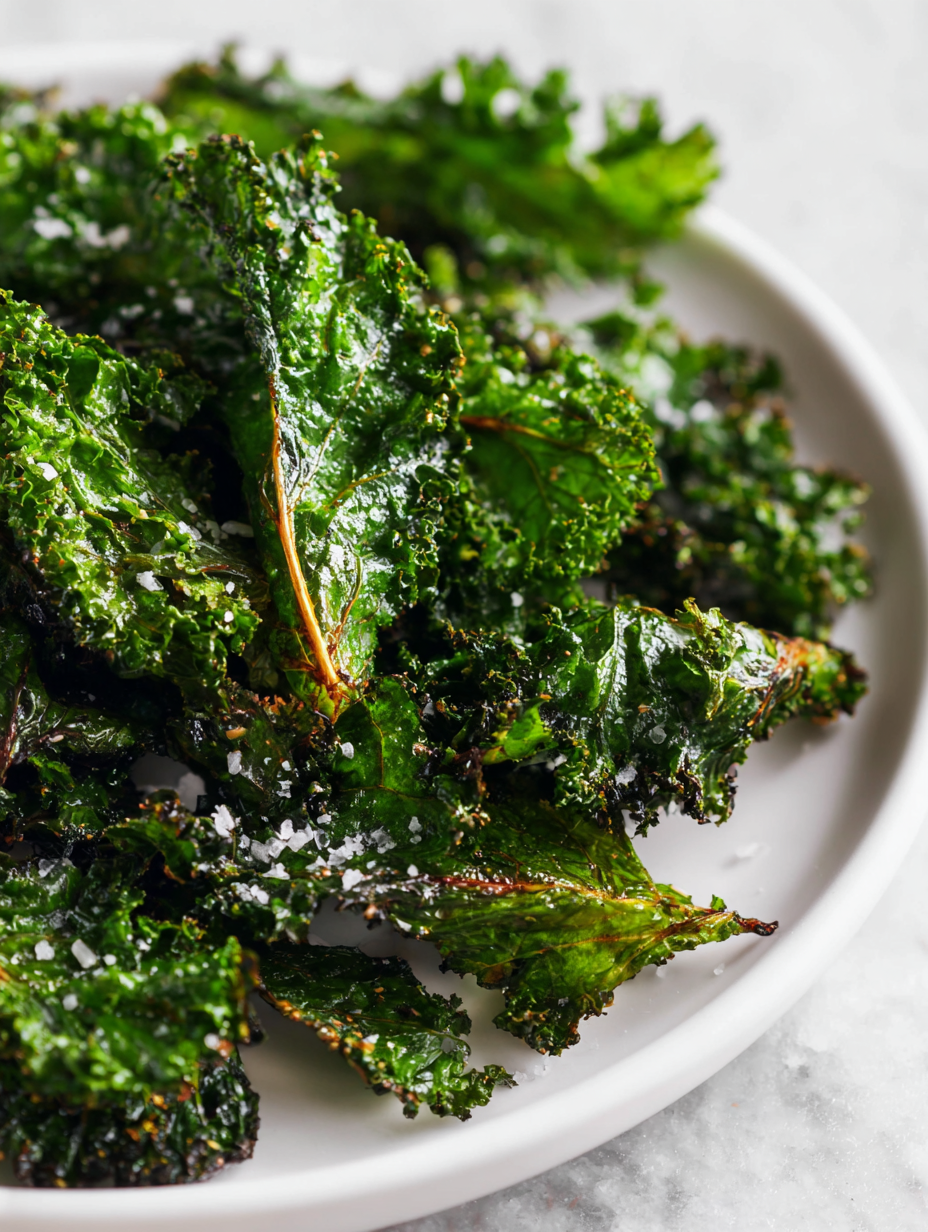
Focusing on how baking kale chips preserves their vibrant green color and intensifies their earthy flavor, making them more appealing and less bitter than fried or dehydrated versions.
The story behind this recipe
- I was messing around in the kitchen one afternoon, trying to find a way to make kale more appealing to my kids. I figured baking might just preserve that bright green and bring out a new, nutty flavor I hadn’t noticed before. It struck me how easy it was to turn a tough, bitter leaf into a crispy, savory snack without much fuss.
- Ever since that first batch, I’ve kept coming back to this method whenever I need a quick, healthy crunch. It’s become a little ritual — washing, tearing, seasoning, baking — and then the smell fills the house with something oddly comforting. I love that it’s honest food, simple but satisfying, and makes kale feel like a treat rather than a chore.
- The process feels like a small act of rebellion against overly processed snacks. Plus, sharing these crispy greens with friends or family always sparks that moment of surprise — ‘Wow, these are actually good!’ It’s a reminder that sometimes, the simplest ideas turn out to be the best.
Ingredient breakdown: key components
- Fresh kale: I love how vibrant and crisp this looks before baking, but don’t skip washing thoroughly—dirt and grit hide in those curly edges. If your kale feels a little wilted, give it a quick refresh; it’ll crisp up better.
- Olive oil: Just a light drizzle coats the leaves evenly, enhancing crunch and flavor. Too much oil makes the chips greasy and dulls their crispness—use sparingly, like a whisper of oil that shimmers on each leaf.
- Sea salt: I prefer flaky sea salt for that burst of briny sharpness. When sprinkling, aim for an even dusting—too much at once can overpower the natural earthy taste, but a light sprinkle adds just enough punch.
- Optional seasonings: Garlic powder, smoked paprika, or nutritional yeast add depth. I like to mix a little smoked paprika for smoky warmth—start small, it’s easy to add more if you want a bolder flavor. The smell of toasted spices is irresistible.
- Baking sheet: Use a rimmed one lined with parchment. It prevents sticking and makes cleanup easier. If your sheets are warped or old, your chips might bake unevenly—swap in a sturdy sheet for even crisping.
- Oven temperature: 175°C (350°F) is perfect—hot enough to crisp quickly without burning. Keep an eye on the first batch; the edges can go from perfect to burnt in seconds—set a timer and check for that golden shimmer.
- Cooling rack: After baking, a wire rack lets air circulate, keeping chips crispy. Resist the urge to pile them straight into a jar—they’ll get soggy if you skip this step. Patience here keeps that crunch intact.
Spotlight on key ingredients
Kale:
- Fresh kale: Its vibrant green and curly texture are key to crispy chips. Dirt hides in the ruffles, so wash thoroughly. Wilted leaves won’t crisp well—refresh if needed.
- Olive oil: Just a whisper coats the leaves, boosting crunch and flavor. Too much makes them greasy and dull. Use sparingly, like a shimmering layer that enhances each leaf’s texture.
Sea salt:
- Flaky sea salt adds a briny punch and enhances the earthy flavor. Sprinkle evenly—too much can overpower, but just enough brings out the natural greens. Crystals should shimmer and melt slightly in the oven’s heat.
- ingredient
Notes for ingredient swaps
- Dairy-Free: Use coconut aminos or nutritional yeast instead of cheese or dairy-based seasonings. It keeps the umami but loses the cheesy richness.
- Salt Options: Sea salt is my go-to for that flaky, briny burst. You can swap with Himalayan pink salt for a milder, mineral note.
- Oil Choices: Avocado oil offers a neutral, high-smoke point option, while sesame oil adds a nutty aroma—use sparingly, it’s potent.
- Sweetener Swap: A light drizzle of honey or maple syrup before baking can add a caramelized crunch, but skip if you want pure savory.
- Seasoning Variations: Toss in a pinch of cayenne or curry powder for a spicy kick—start small, taste and adjust after baking.
- Kale Variants: Dinosaur kale or collard greens work well, but they might be thicker or less curly, so adjust baking time accordingly.
- Vinegar Splash: A tiny dash of apple cider vinegar before baking can brighten flavor, but too much may make leaves soggy.
Equipment & Tools
- Oven: To bake the kale evenly at a controlled temperature.
- Baking sheet with parchment or silicone mat: Provides a non-stick surface for baking and easy cleanup.
- Mixing bowl: To toss and coat the kale evenly with oil and seasonings.
- Towel or paper towels: To dry the kale thoroughly for maximum crispness.
- Cooling rack (optional): To allow air circulation and keep chips crispy after baking.
Step-by-step guide to baked kale chips
- Preheat your oven to 175°C (350°F). Line a rimmed baking sheet with parchment paper or a silicone mat for easy cleanup.
- Wash the kale leaves thoroughly. Shake off excess water and pat dry with a towel. Remove tough stems and tear leaves into bite-sized pieces, about 3-4 inches.
- Place torn kale in a large mixing bowl. Drizzle lightly with about 1 tablespoon of olive oil—just enough to coat the leaves evenly. Toss gently to distribute.
- Sprinkle with sea salt and any optional seasonings like garlic powder or smoked paprika. Toss again to evenly coat the leaves with seasoning.
- Arrange the kale in a single layer on the prepared baking sheet. Spread out so the leaves aren’t overlapping; this ensures crispiness.
- Bake in the preheated oven for 10-15 minutes. Check after 8 minutes; the edges should be golden and crisp. If they start to brown too quickly, lower the heat slightly or reduce baking time.
- Once crispy and bright green with some golden edges, remove from oven. Transfer the kale chips to a cooling rack or a plate to stop further cooking and retain crunch.
- Let the chips rest for 2-3 minutes. They will continue to crisp slightly as they cool. Serve immediately or store in an airtight container once fully cooled.
Allow the chips to cool on a rack for 2-3 minutes to crisp up further. Serve immediately for best crunch, or store in an airtight container once completely cooled to maintain freshness.
How to Know It’s Done
- Edges are golden and slightly crispy, not burnt.
- Kale feels crisp and brittle when gently bent or bitten.
- Color remains vibrant green with some toasted brown spots.
Baked Kale Chips
Ingredients
Equipment
Method
- Preheat your oven to 175°C (350°F) and line a baking sheet with parchment paper or a silicone mat for easy cleanup.
- Thoroughly wash the kale leaves under cold water to remove dirt and grit. Shake off excess water and pat dry completely with a towel or paper towels to ensure they crisp up well.
- Remove the tough stems from the kale and tear the leaves into bite-sized pieces, about 3-4 inches, aiming for uneven sizes for added texture.
- Place the torn kale in a large mixing bowl, then drizzle with about 1 tablespoon of olive oil. Toss gently to coat all the leaves evenly; you should see a light shimmer on each leaf.
- Sprinkle the sea salt evenly over the leaves, along with any optional seasonings like garlic powder or smoked paprika. Toss again to distribute the seasonings thoroughly.
- Arrange the kale leaves in a single layer on the prepared baking sheet, spreading them out so they aren't overlapping. This helps them crisp evenly and prevents sogginess.
- Bake in the preheated oven for 10-15 minutes. Keep an eye on the edges; they should turn a golden brown and feel crispy when gently bent. Check after 8 minutes to prevent burning.
- Once crispy and vibrant green with some toasted spots, remove the baking sheet from the oven. Transfer the kale chips to a cooling rack to prevent moisture buildup and keep them crunchy.
- Allow the chips to cool for 2-3 minutes to further crisp up. Then, enjoy immediately for the best crunch, or store in an airtight container once completely cooled.
Notes
Pro tips for perfect kale chips
- Use a light oil coating to ensure crispness without greasiness. Too much oil can make chips soggy.
- Tear kale into uneven sizes intentionally—smaller pieces crisp faster, larger ones stay tender, adding textural contrast.
- Keep an eye on the oven during the last few minutes; kale edges can go from perfect to burnt quickly.
- Use a cooling rack after baking to keep chips crispy; avoid stacking them directly in a jar while hot.
- Sprinkle seasoning before baking for a deeper flavor; for more intense spice, add half during and half after baking.
Common mistakes and how to fix them
- FORGOT to dry kale thoroughly → Leaves may steam, resulting in soggy chips.
- DUMPED too much oil → Use a light drizzle; excess oil makes chips greasy and dull.
- OVER-TORCHED kale → Check at 10 minutes; golden edges mean perfect crispness.
- SKIPPED cooling step → Rest chips on rack for maximum crunch; skipping causes sogginess.
Quick fixes and pantry swaps
- When kale looks wilted, splash with cold water, pat dry, then refresh before baking.
- If chips are soggy, patch with a quick blast in a hot oven—crisp again in 2 minutes.
- Dumped too much oil? Shake off excess before baking—less grease, better crunch.
- Over-torched? Shield edges with foil, then lower oven temp to save remaining chips.
- Splash a pinch of lemon juice or vinegar if chips taste dull—brighten with a quick acid hit.
Prep, store, and reheat tips
- Pre-wash and thoroughly dry kale leaves ahead of time; store in a paper towel-lined container for up to a day to preserve crispness.
- You can prepare seasoned kale ready for baking a few hours in advance; keep covered in the fridge, but add oil just before baking to avoid sogginess.
- Store baked kale chips in an airtight container at room temperature for up to 2 days; they stay crispy if kept dry and away from humidity.
- Reheat by briefly placing chips in a low oven (around 120°C/250°F) for 2-3 minutes; listen for that crackling sound and check for crispness.
- For longer storage, freeze baked kale chips in a sealed bag for up to a week; re-crisp in a 150°C (300°F) oven for a few minutes, watching for shimmer and crunch.
Top questions about baked kale chips
1. How do I choose the right kale for baking?
Use fresh, vibrant kale leaves for the best crunch and flavor. Wilted or overgrown leaves won’t crisp well. Wash thoroughly and dry completely before baking.
2. How much oil should I use for baking kale chips?
A light drizzle of olive or avocado oil helps the leaves crisp up without becoming greasy. Too much oil makes chips soggy and dull, so just a thin coat is enough.
3. What oven temperature and baking time are best?
Bake at 175°C (350°F) for about 10-15 minutes. Keep an eye on the edges—they should be golden and crispy, not burnt. Check early to prevent over-torching.
4. How should I store leftover kale chips?
Store cooled kale chips in an airtight container at room temperature for up to 2 days. For longer storage, freeze them and re-crisp in the oven later. Reheating should be quick and at a low temp to bring back crunch.
5. What if my kale chips turn out soggy?
If chips are soggy, return them to a hot oven for a few minutes—crackling and shimmer should return. For an extra crunch, a quick blast in the oven works wonders.
6. Can I customize the seasonings?
Use flaky sea salt for a briny burst or experiment with seasonings like smoked paprika or nutritional yeast. Keep seasonings light; you can always add more after baking if needed.
7. How do I prevent soggy or uneven chips?
Avoid overcrowding the baking sheet; spread the leaves in a single layer. Overlapping causes uneven crisping and sogginess. Use a parchment-lined sheet for easy cleanup.
8. How do I prevent burning the chips?
If kale looks brown or burnt too quickly, lower the oven temperature slightly or check the chips earlier. Keep the baking time short for the freshest, crispest results.
9. When should I add seasonings?
For extra flavor, sprinkle seasonings before baking. For bolder taste, add a pinch after baking too. Keep seasonings light to avoid overpowering the earthy kale flavor.
10. Should I tear or cut the kale?
When baking, tear kale into uneven sizes intentionally for contrast—smaller pieces crisp faster, larger ones stay tender. This adds visual interest and varied texture.
Making these baked kale chips is a small act of rebellion against the usual snack rut. The way the scent of toasted greens and spices fills the house makes it feel like a little kitchen victory.
Sometimes, it’s the simplest, most honest snacks that stick with you — crispy, vibrant, and just a little wild. No matter the season or situation, they’re a reminder that good food can be quick, humble, and deeply satisfying.

Welcome to Exploreing New Tastes. I’m really glad you found your way here. I’m a food blogger driven by curiosity more than perfection. I think about flavors constantly, how they change across cultures, how a small tweak can completely shift a dish, and how food tells stories long before anyone sits down to eat. This blog is where I document that curiosity, one recipe and one experience at a time.